Cloud Connect Server (CCS) Integration Guide - v4.0.x
Overview: This article is to be used for the installation and configuration of Cloud Connect Server (CCS) versions 4.0.x.
Note
The Tenfold Bridge is a legacy feature that Tenfold no longer installs or recommends. Information on the bridge is included for customers with older Tenfold configurations. Using Cloud Connect Client is the current approach.
Tenfold suggests all Tenfold Bridge users move to Cloud Connect Client. If you would like to make this change and need help, contact Tenfold Support.
Hardware and network specifications
Cloud Connect Server (CCS) hardware and network specifications
Downloads:
Cloud Connect Server (CCS)
32-bit: CCS v4.6.0
NOTE: Microsoft Windows Server 2016 (not the latest update build < 14393.3986) may have connection issues with Avaya IP Office.
64-bit: CCS v4.6.0 (3CX only)
Cloud Connect Client: CCC 2.0.5
Download CCS.
Extract (UnZip) the downloaded CCS Zip folder
Open Command Prompt (CMD.exe) as administrator
Navigate to downloaded CCS folder
Type:
.\bats\install_1.bat
When the script is done, restart the computer.
Open CMD.exe as administrator
Navigate to downloaded CCS folder
Type:
.\bats\install_2.bat
Follow prompts. Note this process can take 5 to 10 minutes to complete and may look like it froze while SQL is being installed.
When the script is done, restart the computer.
Open
CMD.exeas administrator.Navigate to downloaded CCS folder
Type:
.\bats\install_3.bat
When the script is done, restart the computer.
Right-click on the newly created UCConfig shortcut on the desktop
Select Properties and then Compatibility
Check Run this program as an administrator and press OK
Note: The Install location for CCS 4.0.x is in C:\Program Files\Tenfold
Open Windows Services and Stop Cloud Connect Server and Cloud Connect Telephony [Customer Org] from running. (Note: Cloud Connect Telephony is created during the Connecting PBX to CCS steps)
Open Notepad or a similar program as administrator (Notepad++ recommended)
Open
C:\Program Files\Tenfold\OnPremCCS\bin\UCTelephony.exe.configIn the <
runtime>section add:<loadFromRemoteSources enabled="true"/>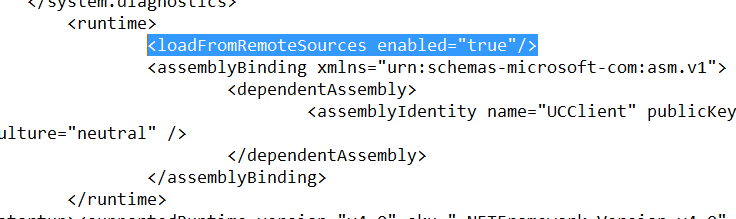
Save the file and restart CCS services: Cloud Connect Server and Cloud Connect Telephony.
Right-click on the UCConfig icon on the desktop and select Run as Administrator.
Click on the Classic Menu button (2.x and 3.x only)
Click on Equipment and then (New Site) (Note that a forward slash (/) is not supported in the site name and will cause the UCTelephony service to not be created)
Enter the name of the server, select country code, and area code.
Click Save
Click on Phone System (PBX)
In the Type, dropdown select your PBX
Enter in the appropriate information for your PBX
Press Save and then press Start.
The status will change to CONNECTED if the CCS can properly connect to the PBX, and you should see logging begin.
Right-click on the UCConfig icon on the desktop and select 'Run as Administrator' (if you do not already have it open).
Click on the Classic Menu button (2.x and 3.x only)
Click on Equipment and then Extensions
Request a list of extensions from the customer (usually easily exported at the PBX)
Format those extensions (Comma-separated lists accepted i.e.: 001, 002, 003, 004)
For an extension to populate in the Tenfold Dashboard User's page, you'll want to have that user place a call to an external number. Once complete if you go to that user in the Tenfold Dashboard, push the plus sign, then their extension should be available to select and add as you type it. More details about this can be found here: Assign user extensions.
Download CCC.
Cloud Connect Client: CCC 2.0.5
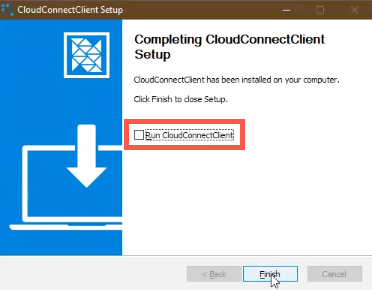
Double-click the ZIP file and extract the installation files.
Open the installation folder and double-click the CloudConnectClient Setup <version>.exe file.
When the installation finishes, clear the Run CloudClientConnect option and then click Finish.
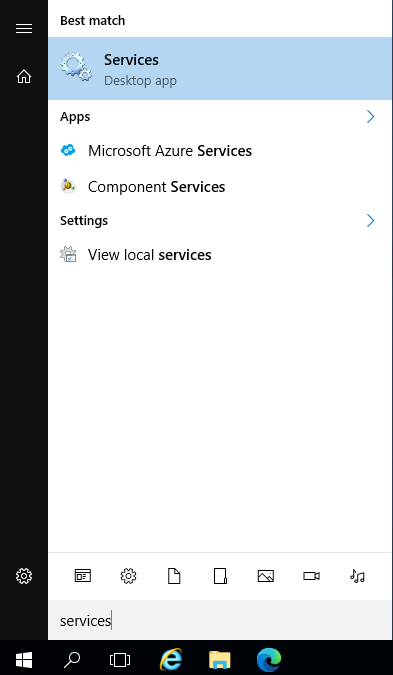
Go to Services.
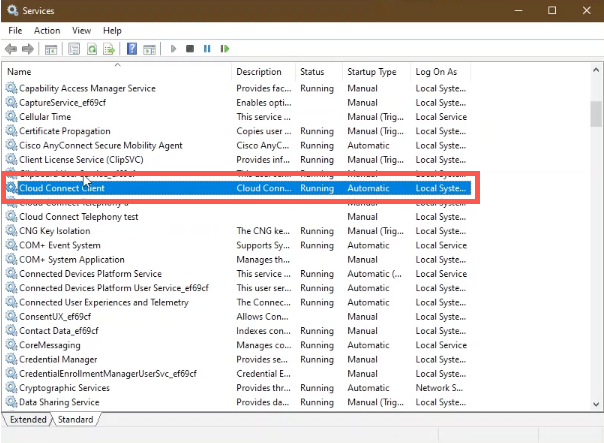
Check that the Cloud Connect Client service is running.
Right-click the Cloud Connect Client Desktop shortcut and click Run as administrator.
Enter your Organization ID in the field provided.
To find your ID, log in to Tenfold Dashboard and click the Company Settings tab. The Organization ID is at the top of the page.
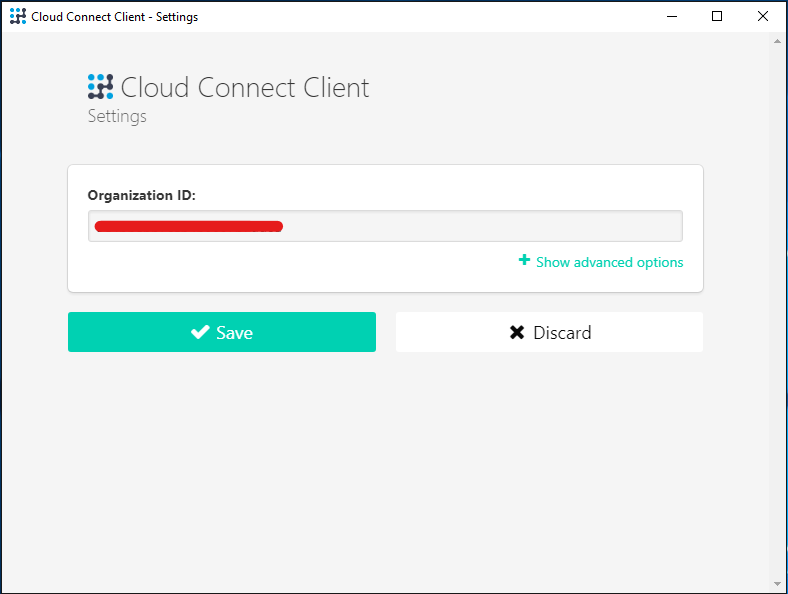
Click Save and proceed to the next step to begin installing Cloud Connect Monitor.
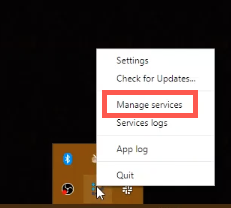
Open the Windows System Tray, right-click the Cloud Connect Client icon and then click Manage Services.
The following directory opens:
C:\Program Files\CloudConnectClient\locales\app.asar.unpacked\binOpen a Command Prompt, copy the
bindirectory location, and type the following at the Command Prompt:cd C:\Program Files\CloudConnectClient\locales\app.asar.unpacked\bin
In the Command Prompt Window, type:
install.bat
NOTE: A service failure message initially displays. Wait a moment and the installation will start.
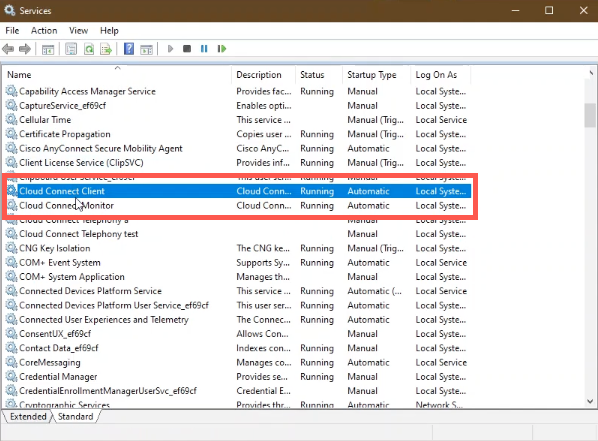
When the installation is complete, check Windows Services to ensure both Cloud Connect Client (CCC) and Cloud Connect Monitor (CCM) are running.
CCC + CCM Installation Video:
Note
The Tenfold Bridge is a legacy feature that Tenfold no longer installs or recommends. Information on the bridge is included for customers with older Tenfold configurations. Using Cloud Connect Client is the current approach.
Tenfold suggests all Tenfold Bridge users move to Cloud Connect Client. If you would like to make this change and need help, contact Tenfold Support.
Download Tenfold Bridge:
Extract (UnZip) the TenfoldBridge folder in the
C:\Tenfold folderOpen the TenfoldBridge folder and open the tenfold-tcp-bridge folder
Before proceeding, confirm that .NET Framework 3.5 (it must be this version) is already installed.
Right-click on install_services and select 'Run as Administrator' (or run via Command Prompt)
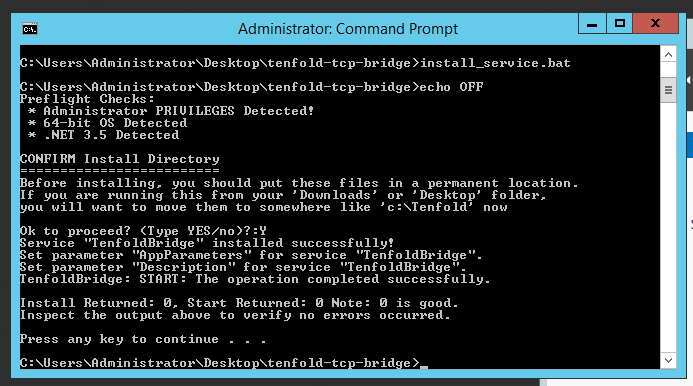
Follow the prompts
There is no configuration needed. Once the installation is complete the Tenfold Bridge will show that it is running in Windows Services.

From time to time, your Virtual Machine/Server will need to restart (i.e. Windows Updates, Software Updates, Power Failures, Driver Updates, etc). In the event that it does, you will want to make sure that CCS is also restarted and running once the system restart is complete.
CCS Windows system services
Open Windows Service
Set all CCS services to Automatic start:
Cloud Connect Server, Cloud Connect Telephony Phone System Name(s) (Delayed Start), Cloud Connect Client, Cloud Connect Monitor, and Tenfold Bridge (legacy configurations).
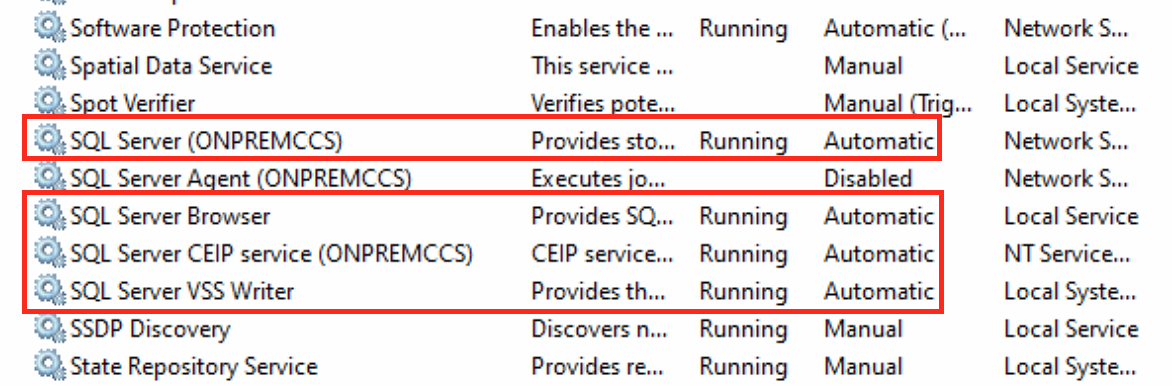
Additional Services to account for are the following SQL Server services: Server (ONPREMCCS), Server Browser, Server CEIP service (ONPREMCCS), Server VSS Writer
If any CCS services do not start after a system reboot, we suggest setting the service start to Automatic (Delayed Start)
Suggested CCS service manual startup order
SQL Server services (mentioned above)
Cloud Connect Server
Cloud Connect Client
Cloud Connect Monitor
Tenfold Bridge (optional, legacy configurations)
Cloud Connect Telephony Phone System Name(s)
Log in to the Tenfold Dashboard using an Administrator account for your Org.
Select the Features tab
Click on Cloud Connect from the Features list
Click on the red Disabled button to switch it to Enabled (refresh page to confirm)
Legacy configurations: Check “Click to Dial (CTD) using TCP Producer only” if Tenfold Bridge is installed and working to use it exclusively. Do not check this if Tenfold Bridge is not installed. More Details around Single and Redundant Producer found here.
Push Save and wait for confirmation. (this overwrites all of the above configuration settings)
Click on Cloud Connect Monitor from the Features list
Click on the red Disabled button to switch it to Enabled (refresh page to confirm)
Click on Phone System
Select the appropriate phone system from the drop-down.
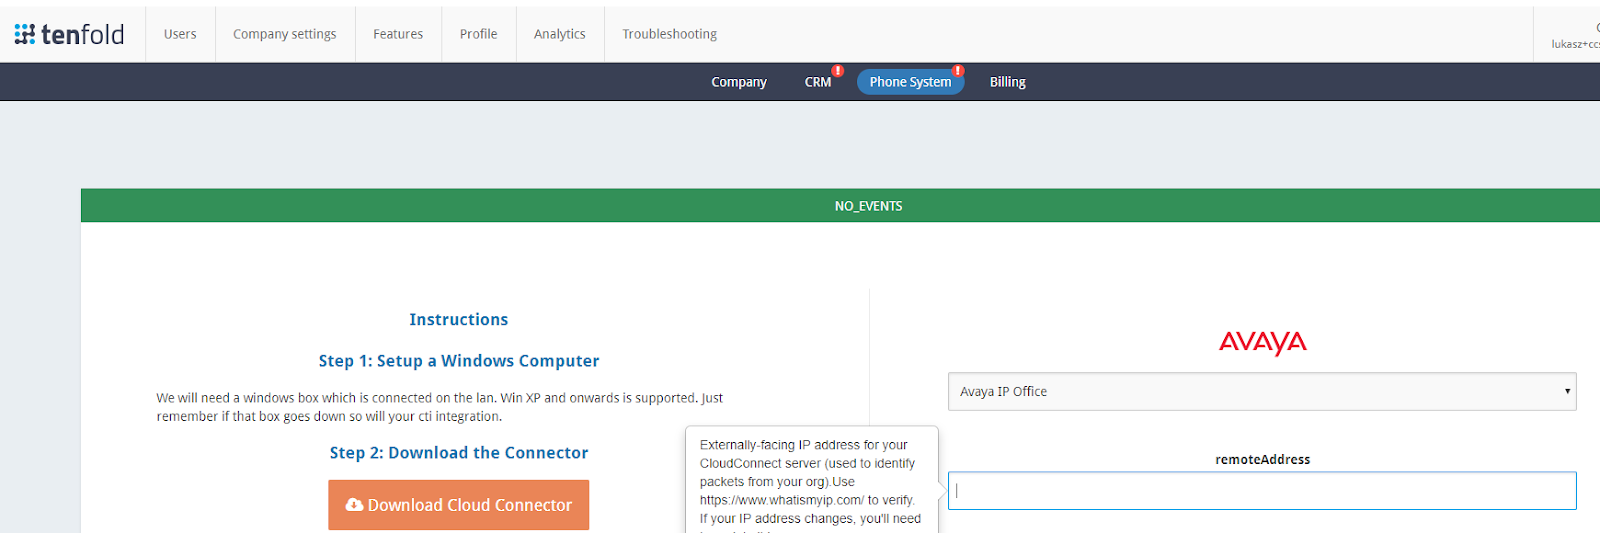
In the Remote Address field, enter the public IP address for the server that the CCS is installed on and press Save (The bar should change to green and show Connected if the CCS is successfully connected to the Tenfold Cloud).
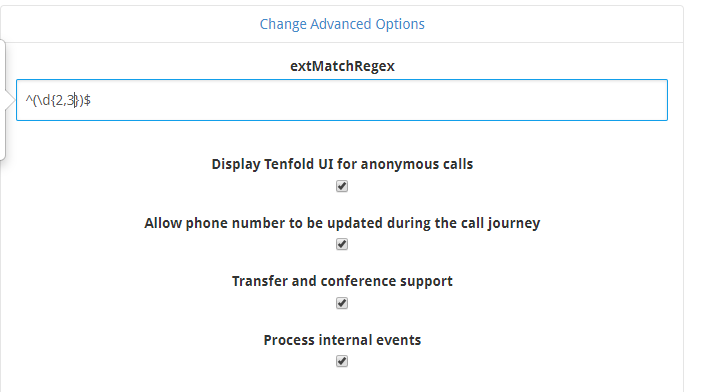
In the same tab, click Change Advanced Options to set extMatchRegex for matching what internal numbers will look like. (Useful Regex site: regex101.com) - Confirm with a Tenfold TSE if further assistance is needed.
Check the appropriate checkboxes based on the Customer’s needs for the Phone System integration.
Click save and check if all settings are correct.
Go to the Troubleshooting tab
Click Cloud Connect Monitor to ensure that you are properly connected to the CCS via the Tenfold Dashboard, looking for any errors there.
Note
The Tenfold Bridge is a legacy feature that Tenfold no longer installs or recommends. Information on the bridge is included for customers with older Tenfold configurations. Using Cloud Connect Client is the current approach.
Tenfold suggests all Tenfold Bridge users move to Cloud Connect Client. If you would like to make this change and need help, contact Tenfold Support.
Contact a Tenfold Support Engineer (TSE), requesting they “update the Producer type (optional) setting from the Internal Org Details page in Org-Management for your Org to Single or Redundant” based on the following configuration types being met...
Producer type single + Cloud Connect Client active = commands all go over CCC and Tenfold receives all events over CCC. You use this when not deploying the Tenfold Bridge at all with CCS.
Producer type redundant + Cloud Connect Client active = commands first try Tenfold Bridge (socket), then CCC if Tenfold Bridge is disconnected/unavailable. We use this configuration when deploying both CCC and Tenfold Bridge services
Producer type single + Cloud Connect Client inactive = commands all go over tenfold bridge with no fallback to CCC and we do not de-dup Tenfold Bridge events. We use this configuration when we ONLY DEPLOY Tenfold Bridge and DO NOT deploy CCC.
Producer type redundant + Cloud Connect Client inactive = commands all go over Tenfold Bridge with no fallback to CCC but we will try to de-dup events received over Tenfold Bridge. We use this configuration when we ONLY DEPLOY Tenfold Bridge and DO NOT deploy CCC, but want to add some form of persistent redundancy.
IMPORTANT NOTE: The TCP preference on the Cloud Connect Feature (Click to Dial (CTD) using TCP Producer only) if enabled, then all commands will go over the Tenfold Bridge (socket) regardless of the above setup.
Network Connectivity Checks
These tests do require the use of the Telnet client which may not be installed on the Windows server by default.
Open CMD (Command Prompt) and type the following command:
telnet ent1.bridge.callinize.com 3026
Successful connection results
$ telnet ent1.bridge.callinize.com 3026
Trying 54.235.107.161…
Connected to ent1.bridge.callinize.com.
Escape character is '^]'
Unsuccessful connection results
$ telnet ent1.bridge.callinize.com 3026
Connecting To ent1.bridge.callinize.com 3026...Could not open a connection to the host on port 3026: Connect failed
Testing HTTPS connection for CCC to events.tenfold.com and intake.tenfold.com. Type the following commands in CMD (Command Prompt)
For events.tenfold.com:
curl https://events.tenfold.com/ping
If successful will return Pong
For intake.tenfold.com:
curl https://intake.tenfold.com/ping
If successful will return Pong
NOTE: If either the Tenfold Bridge (legacy) or Cloud Connect Client has issues connecting properly, please contact Tenfold Support to assist with the troubleshooting.
Troubleshooting
Please visit the Cloud Connect Troubleshooting page or contact us here.