ServiceNow Integration Guide
The benefits of Tenfold CTI working as the ServiceNow OpenFrame Embedded UI:
Audience
This document is intended for organizations interested in using Tenfold in a ServiceNow environment. Those who will perform the procedures described in this guide should have a basic level of familiarity with ServiceNow APIs, ServiceNow administration, general networking, and Tenfold.
Goals
The goal of this document is to provide knowledge, reference, and procedural information necessary to understand a proposed ServiceNow/Tenfold integration.
This document is NOT intended as a specific system or network design document. If further clarification is needed, consult with your Tenfold Customer Success Manager (CSM) and/or Technical Account Manager (TAM).
Terminology
To ensure a common frame of reference, this guide uses the following terms in conjunction with this ServiceNow integration:
Plugin: Plugins are software components that provide specific features and functionalities within a ServiceNow instance, usually provided by ServiceNow itself. For more details on ServiceNow plugins, see ServiceNow plugins.
App: Just like plugins, ServiceNow apps extend a given CRM instance with features and functionalities. Apps are usually developed by third-party companies like Tenfold, and installed from the ServiceNow Store. Tenfold ServiceNow apps should not be confused with Embedded Client.
Tenfold Embedded UI: Refers to the Tenfold embedded UI for ServiceNow.
Tenfold Platform: Refers to the Tenfold backend components (such as API, processor and other microservices).
Tenfold Dashboard: A cloud-based administrative and user dashboard.
Customer responsibilities
You are responsible for supplying the physical and/or IP connections to ServiceNow and LAN, and for obtaining and loading any licensing required by ServiceNow. You are also responsible for configuring ServiceNow to support the Tenfold integration.
Integration overview
The Tenfold App for ServiceNow is installed from the ServiceNow app store into the customer instance. It adds not only the necessary roles and fields used by the Tenfold integration but also the necessary tables and endpoints used.
During installation, the customer will install the Tenfold App aligned to the customer use case. For example:
Tenfold for ServiceNow ITSM
Tenfold for ServiceNow CSM
Tenfold for ServiceNow ITSM + CSM
Requirements
Connection requirements
ServiceNow instance accessible by Tenfold Cloud via port 443
Dedicated Service Account (i.e. API User)
Version requirements
Tenfold supports N-2 versions of ServiceNow where N is the latest release.
Architectural overview

Dependencies
The integration with ServiceNow depends on the following ServiceNow plugins:
Openframe
Enables support for phone calls and CTI integration (support for click to dial, embedded clients, etc) inside of ServiceNow. This plugin is mandatory. For more details on OpenFrame, see Computer telephony integration (CTI).
ITSM
The IT Service Management plugin adds support to several modules in ServiceNow, including support for Incident management. The requirement for this plugin depends on the customer use cases and if Incident support is not required, it doesn’t need to be installed. For more details on ITSM, see IT Service Management (ITSM).
CSM
The Custom Service Management plugin adds support to several modules in ServiceNow, including support for Cases and Contacts. Case is a module similar to Incidents (from ITSM), whereas Contacts is similar to Users. The requirement for this plugin depends on the customer use cases. For more details on CSM, see Customer Service Management (CSM).
Important
All Tenfold apps for ServiceNow depend on the OpenFrame plugin. For plugin installation instructions, see Install plugins for ServiceNow and Install the Tenfold UI for ServiceNow OpenFrame.
Advisories
When configuring
choicetype fields to be used within theDispositionsfeature, ensure that you have configured the field in ServiceNow to have a default value. If a default value is not set, calls may not log to ServiceNow correctly.The state of an interaction record changes automatically based on call events.
If the interaction is created while the call ringing, the state is set to
New.If the interaction is created or updated while the call is connected, the state is set to
Work In Progress.If the interaction is created or updated after the call is disconnected, the state is set to
Closed Complete.
Automatically popping an interaction record results in a new browser tab opening.
Tenfold apps for ServiceNow
Overview
The Tenfold App for ServiceNow is a ServiceNow app that is installed from the ServiceNow Store into the customer instance. It adds not only the necessary roles and fields used by the Tenfold integration but also the necessary tables and endpoints used. Each app consists of a common core app plus a branded wrapper.
The core app is the app that installs all fields, tables, and roles used by the integration. It is not meant to be installed directly. The core apps can be thought of as a library. The branded wrapper, in turn, adds the branded portion of the integration like the embedded support page, application registry, etc (see app components below for more details) and depends on the relevant core app. The core apps are:
CTI Connector for CSM + ITSM - core app with support to both CSM and ITSM
CTI Connector for CSM - core app with support to CSM only
CTI Connector for ITSM - core app with support to ITSM only
The branded wrappers are meant to be installed from the store and, while installing them, ServiceNow identifies the dependency on one of the core apps and prompt users to install them as well. The Branded wrappers for Tenfold are:
Tenfold for CSM + ITSM - branded wrapper for CTI Connector for CSM + ITSM
Tenfold for CSM - branded wrapper for CTI Connector for CSM
Tenfold for ITSM - branded wrapper for CTI Connector for ITSM
Tenfold for CSM + ITSM
This app is very similar to the legacy Tenfold for ServiceNow app and offers support to the same modules. This app requires the core app for CSM + ITSM.
Tenfold for CSM
This app offers support for CSM, but not ITSM. It requires the core app for CSM.
Tenfold for ITSM
This app offers support for ITSM, but not CSM. It depends on the core app for ITSM.
Reading/Writing data to ServiceNow
Due to ServiceNow requirements, third-party companies cannot write data directly into customer instances. Instead, ServiceNow uses the concept of staging tables. Data is written to them, and internally ServiceNow applies mappings to write data to the correct tables. This is true for all write operations, such as creating records, logging phone calls, updating entities, etc., but does not apply to read operations (such as fetching users, for example). Reading can occur directly from the relevant tables.
Data schema
ServiceNow tables and fields
Table name | Description |
Case (sn_customerservice_case) | Table for storing cases associated with contacts |
Contact (customer_contact) | Table for storing contacts (extends from sys_user) |
Customer Task (sn_customerservice_task) | CSM module for Tasks (extends from task) |
Incident Task (incident_task) | ITSM module for Tasks (extends from task) |
Incident (incident) | Table for storing incidents associated with users |
Phone Call (sn_openframe_phone_log) | Table for storing phone calls |
Task (task) | Table for storing tasks |
User (sys_user) | Table for storing users |
Below is the list of custom fields added by the app and their respective tables:
Field name | Table | Description |
Additional Phone 1 (APP_PREFIX_additional_phone_1) | User (sys_user) | Additional phone field for user |
Additional Phone 2 (APP_PREFIX_additional_phone_2) | User (sys_user) | Additional phone field for user |
Additional Phone 3 (APP_PREFIX_additional_phone_3) | User (sys_user) | Additional phone field for user |
Call Purpose (APP_PREFIX_call_category) | Phone Call (sn_openframe_phone_log) | Disposition to store call purpose |
Caller (APP_PREFIX_caller_sys_id) | Task (task) | Field to store the caller associated with a follow up task |
Caller (APP_PREFIX_caller_sys_id) | Phone Call (sn_openframe_phone_log) | Field to store the caller associated with a phone call |
Description (APP_PREFIX_description) | Phone Call (sn_openframe_phone_log) | Field to store call notes |
Owner (APP_PREFIX_created_by_sys_id) | User (sys_user) | Owner of the user |
Owner (APP_PREFIX_created_by_sys_id) | Task (sys_user) | Owner of the task |
In addition to the custom fields listed above, it’s important to note that Tenfold also creates tables and fields to implement the staging tables previously mentioned. For each of the ServiceNow tables used, there’s an equivalent staging table and a mapping that copies data from the staging table to the actual ServiceNow table. In this way, the fields in the staging tables all map to the ones in the standard ServiceNow tables. The APP_PREFIX string mentioned above refers to the unique prefix of each individual app (covered in the App scopes section ).
Custom views
While it’s possible to fully customize all forms and views in ServiceNow, the app installs a custom view for the phone call entity that already includes the custom fields Tenfold uses. To switch to this view or to further customize the phone call (or other) views, see Customize views in ServiceNow.
App scopes
To avoid conflicts between each installed app, ServiceNow gives each app a unique prefix that precedes each field, table, or custom entity created by the app. The relevant prefixes are:
App | App scope |
Tenfold for ServiceNow (legacy app) | x_93331_tenfold_sn |
Tenfold for CSM + ITSM | x_calli_cti_connec |
Tenfold for CSM | x_calli_cti_csm |
Tenfold for ITSM | x_calli_cti_itsm |
Roles and permissions
Everything in ServiceNow requires some sort of role. Access to the Tenfold apps for ServiceNow is no different. Each app creates its own custom role, and the integration user used to authenticate against ServiceNow and allow data to flow between Tenfold and ServiceNow needs to have such a role. They are:
App | App scope |
Tenfold for ServiceNow (legacy app) | x_93331_tenfold_sn.user |
Tenfold for CSM + ITSM | x_calli_cti_connec.user |
Tenfold for CSM | x_calli_cti_csm.user |
Tenfold for ITSM | x_calli_cti_itsm.user |
Agents who use the embedded application require an additional role (sn_openframe_user), otherwise, they do not have access to the Tenfold UI. See this question for details.
Authentication with ServiceNow
Authentication with ServiceNow happens through an OAuth client installed on the ServiceNow instance along with the app. Each OAuth client of each individual app has a unique ID and this ID is very important when connecting to ServiceNow as it is used to identify what type of app Tenfold is integrating with. It’s also important to integrate via a user with the correct permissions when connecting to ServiceNow through the OAuth client; otherwise, the Tenfold backend will not be allowed to read/write data to ServiceNow. For instructions on how to authenticate against ServiceNow, see the Installation section.
Install and connect to Tenfold
NOTE: If you have not already done so, install the OpenFrame plugin. For more information, see Install plugins for ServiceNow.
Install the Tenfold app for ServiceNow in a customer instance
Customer instances should install the app from the ServiceNow Store. The first step is to select the correct app:
App name | Description |
Tenfold for ServiceNow | Legacy Tenfold app. Is currently under deprecation process and will be replaced by the other apps below. Should only be used until the three new apps are in review process by ServiceNow. For customers already using it, a migration process will be necessary |
Tenfold for CSM + ITSM | New app for customers that require support to both ITSM and CSM modules |
Tenfold for CSM | New app for customers that require support to CSM modules only |
Tenfold for ITSM | New app for customers that require support to ITSM modules only |
For more information about the different Tenfold apps, refer to Tenfold apps for ServiceNow.
Enable the Tenfold app within ServiceNow
The embedded client for ServiceNow is not active by default when the Tenfold for ServiceNow apps are installed. To enable the embedded client:
Install OpenFrame if you have not already done so. You may also need to install the Customer Service module.
For more information on installing plugins, see Install plugins for ServiceNow.
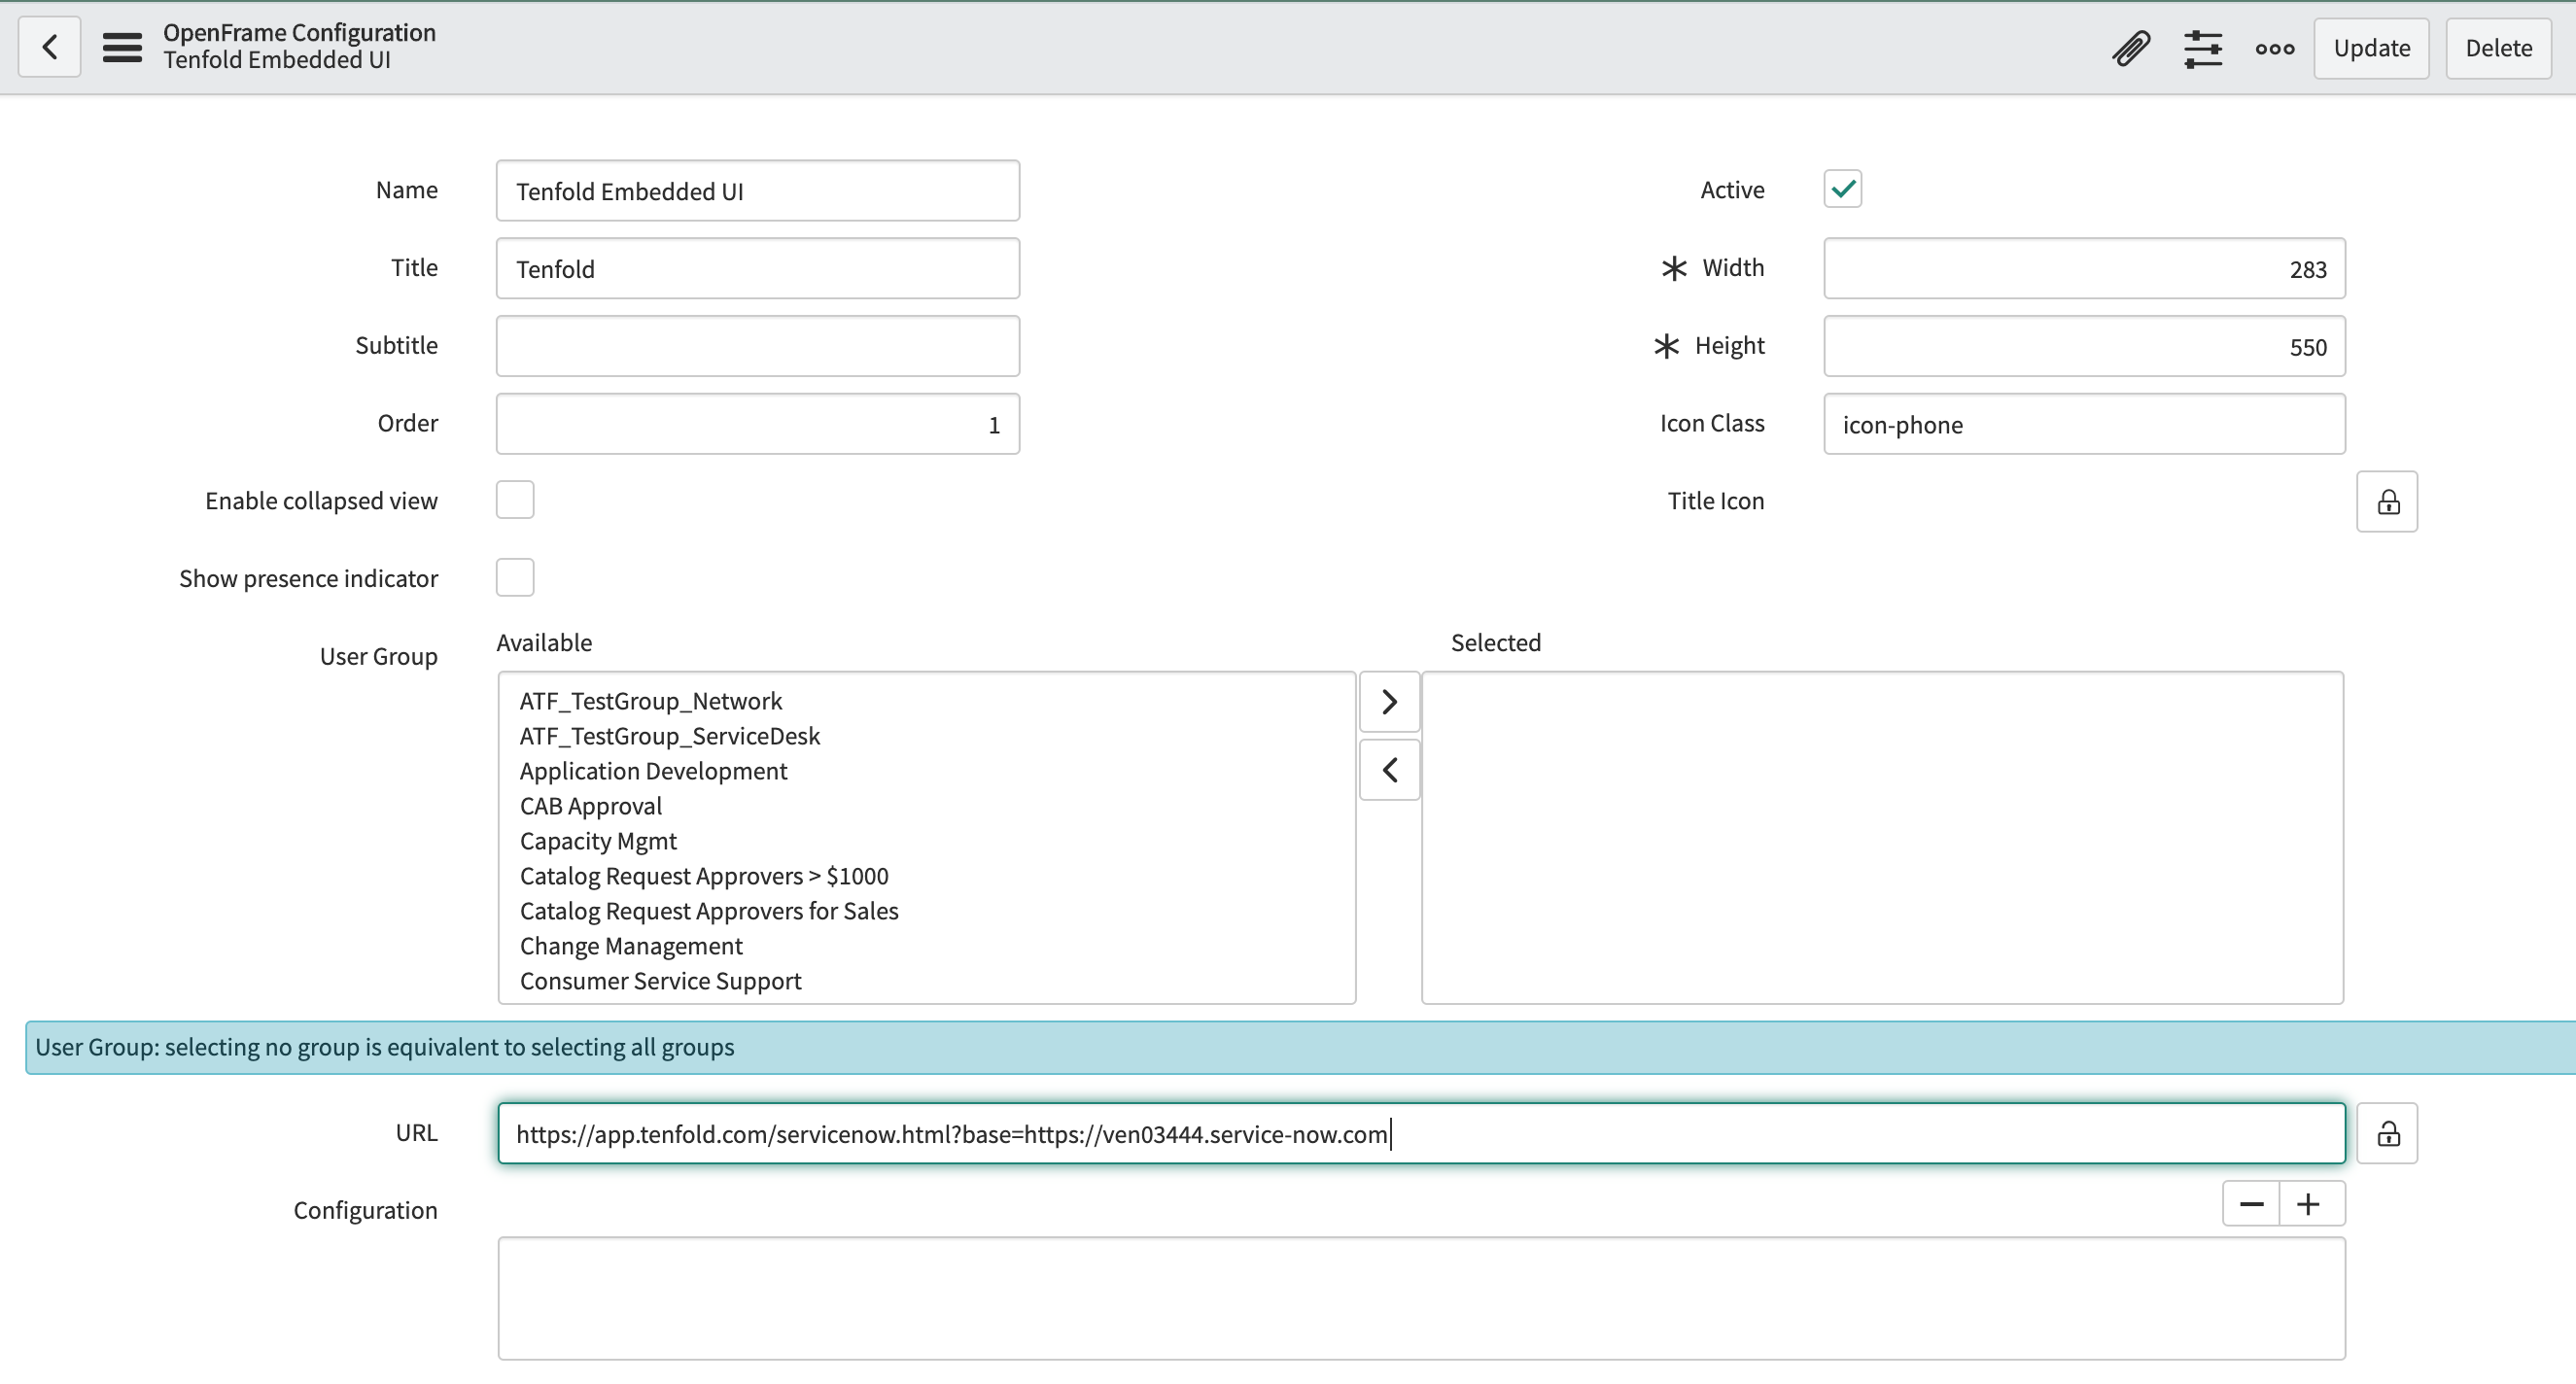
In the Navigation filter, search for “openframe”. Click Configurations in your filter results, then click New next to OpenFrame Configurations.

Provide values for Name, Title, Width, Height and URL. Recommended values are below:
Title
Description
Name
Tenfold Embedded UI
Title
Tenfold
Active
Check the box
Width
283
Height
550
Icon Class
icon-phone
Order
1
URL
The URL value is:
https://app.tenfold.com/servicenow.html?base=YOUR_INSTANCE_HOST
If your service now instance is, for example, https://ven03444.service-now.com, then the URL for your embedded client is:
https://app.tenfold.com/servicenow.html?base=https://ven03444.service-now.com
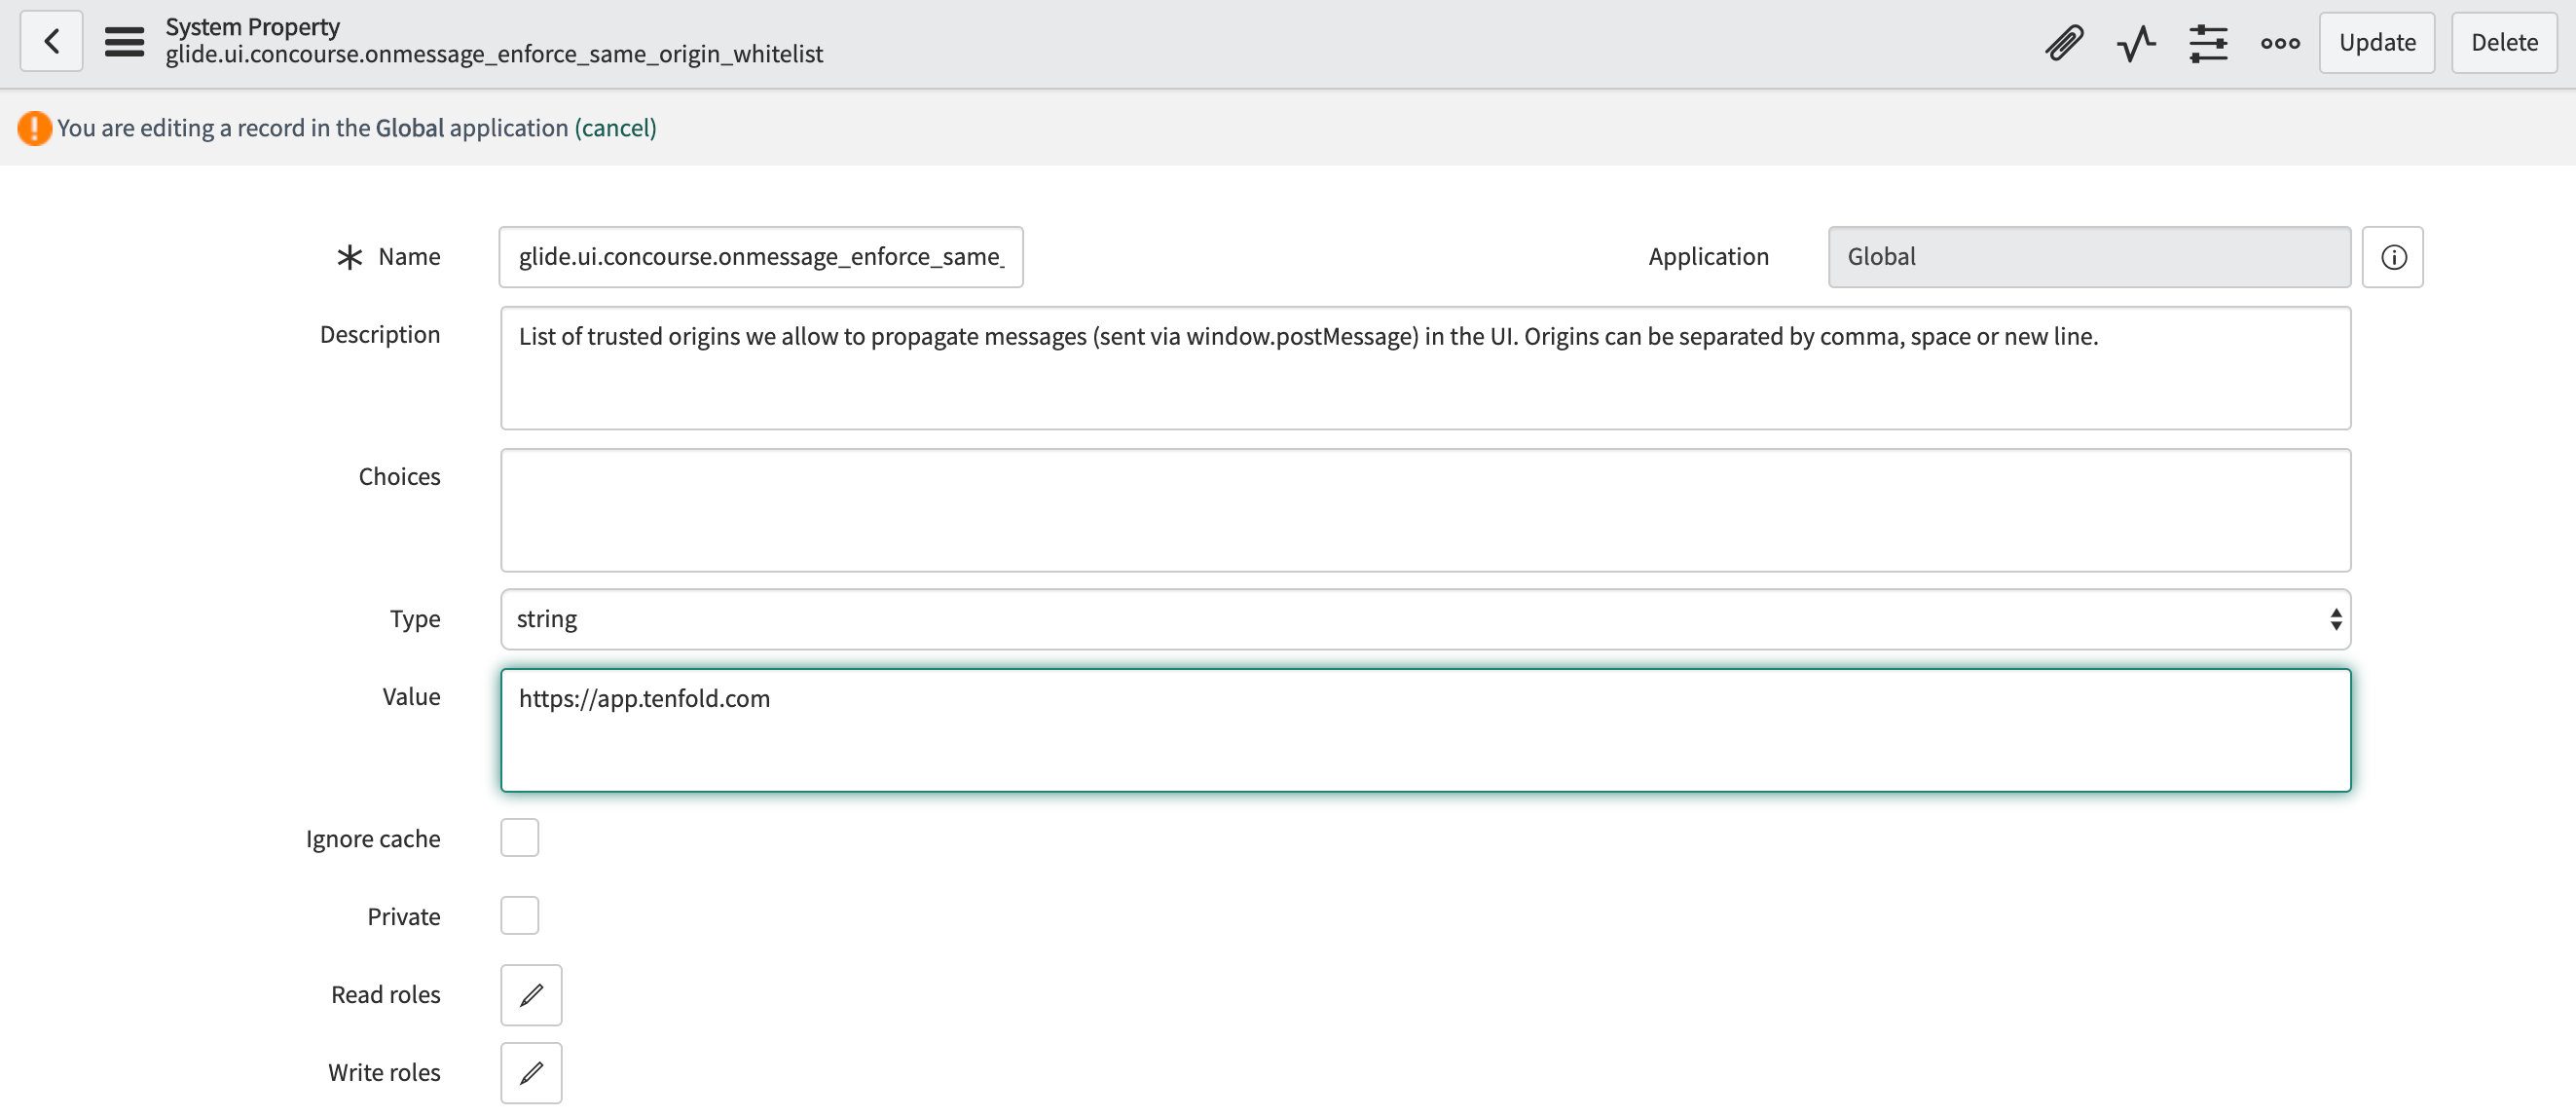
In the Filter navigator type "sys_properties.list" and press Enter.
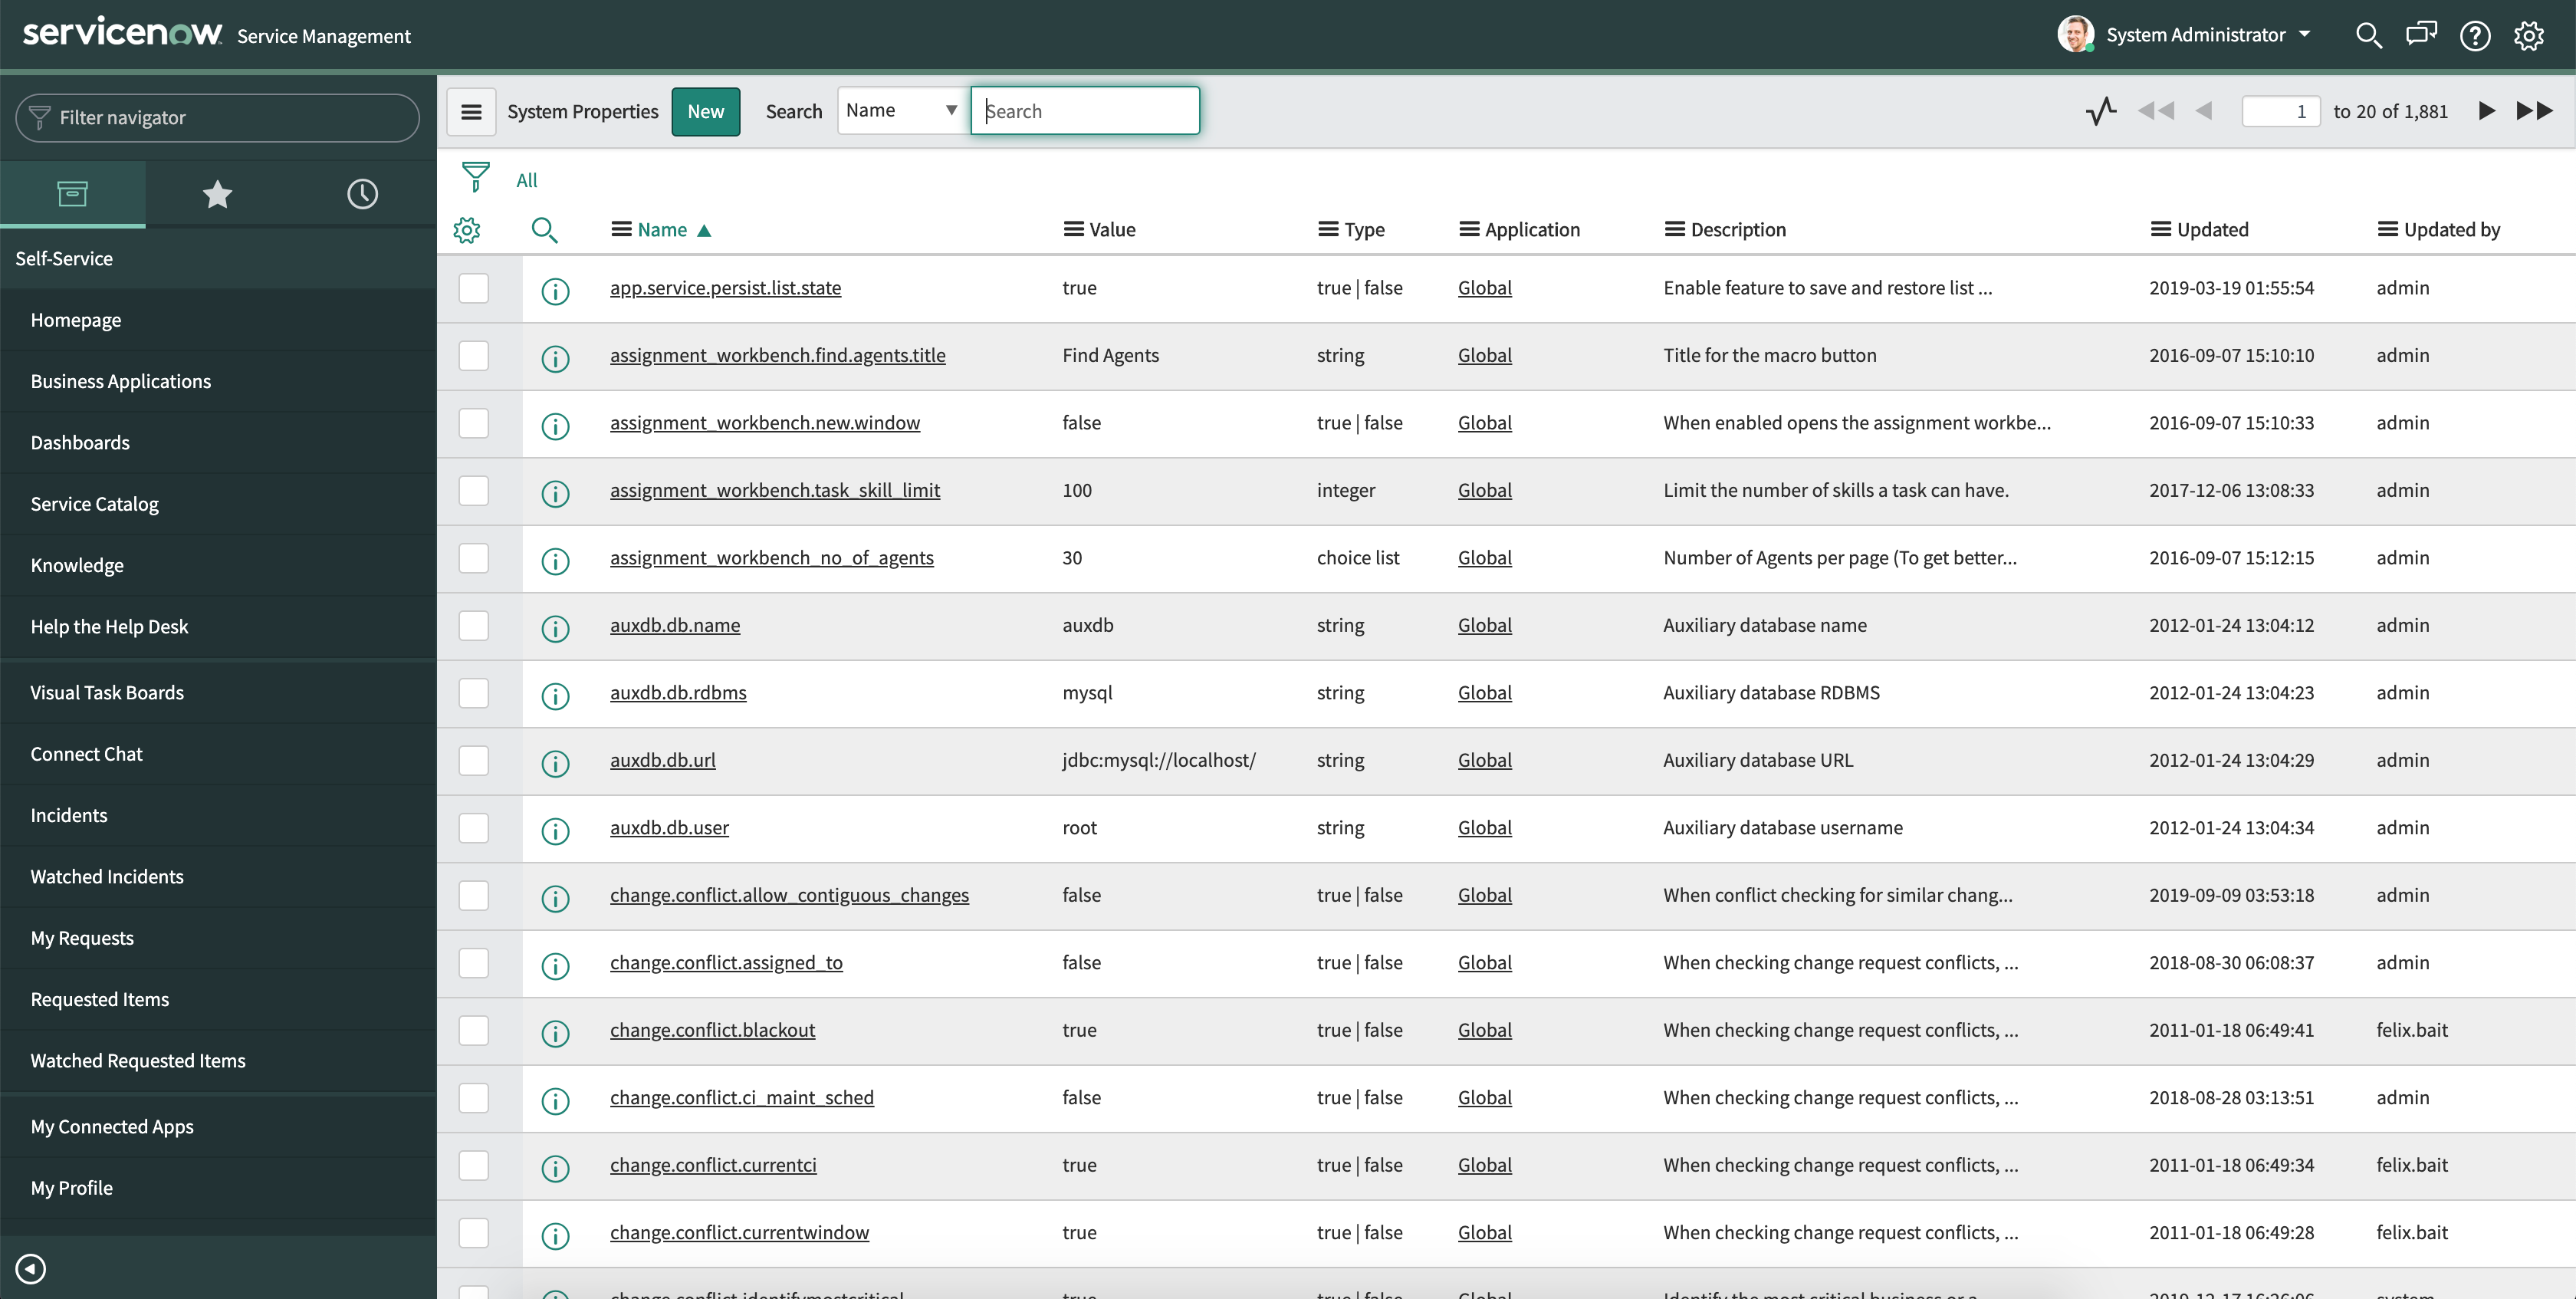
Search for the property
glide.ui.concourse.onmessage_enforce_same_origin_whitelist.Edit this property and add "https://app.tenfold.com" to the values.
Refresh the screen and you should see a phone icon. Click it and you should see the embedded client.
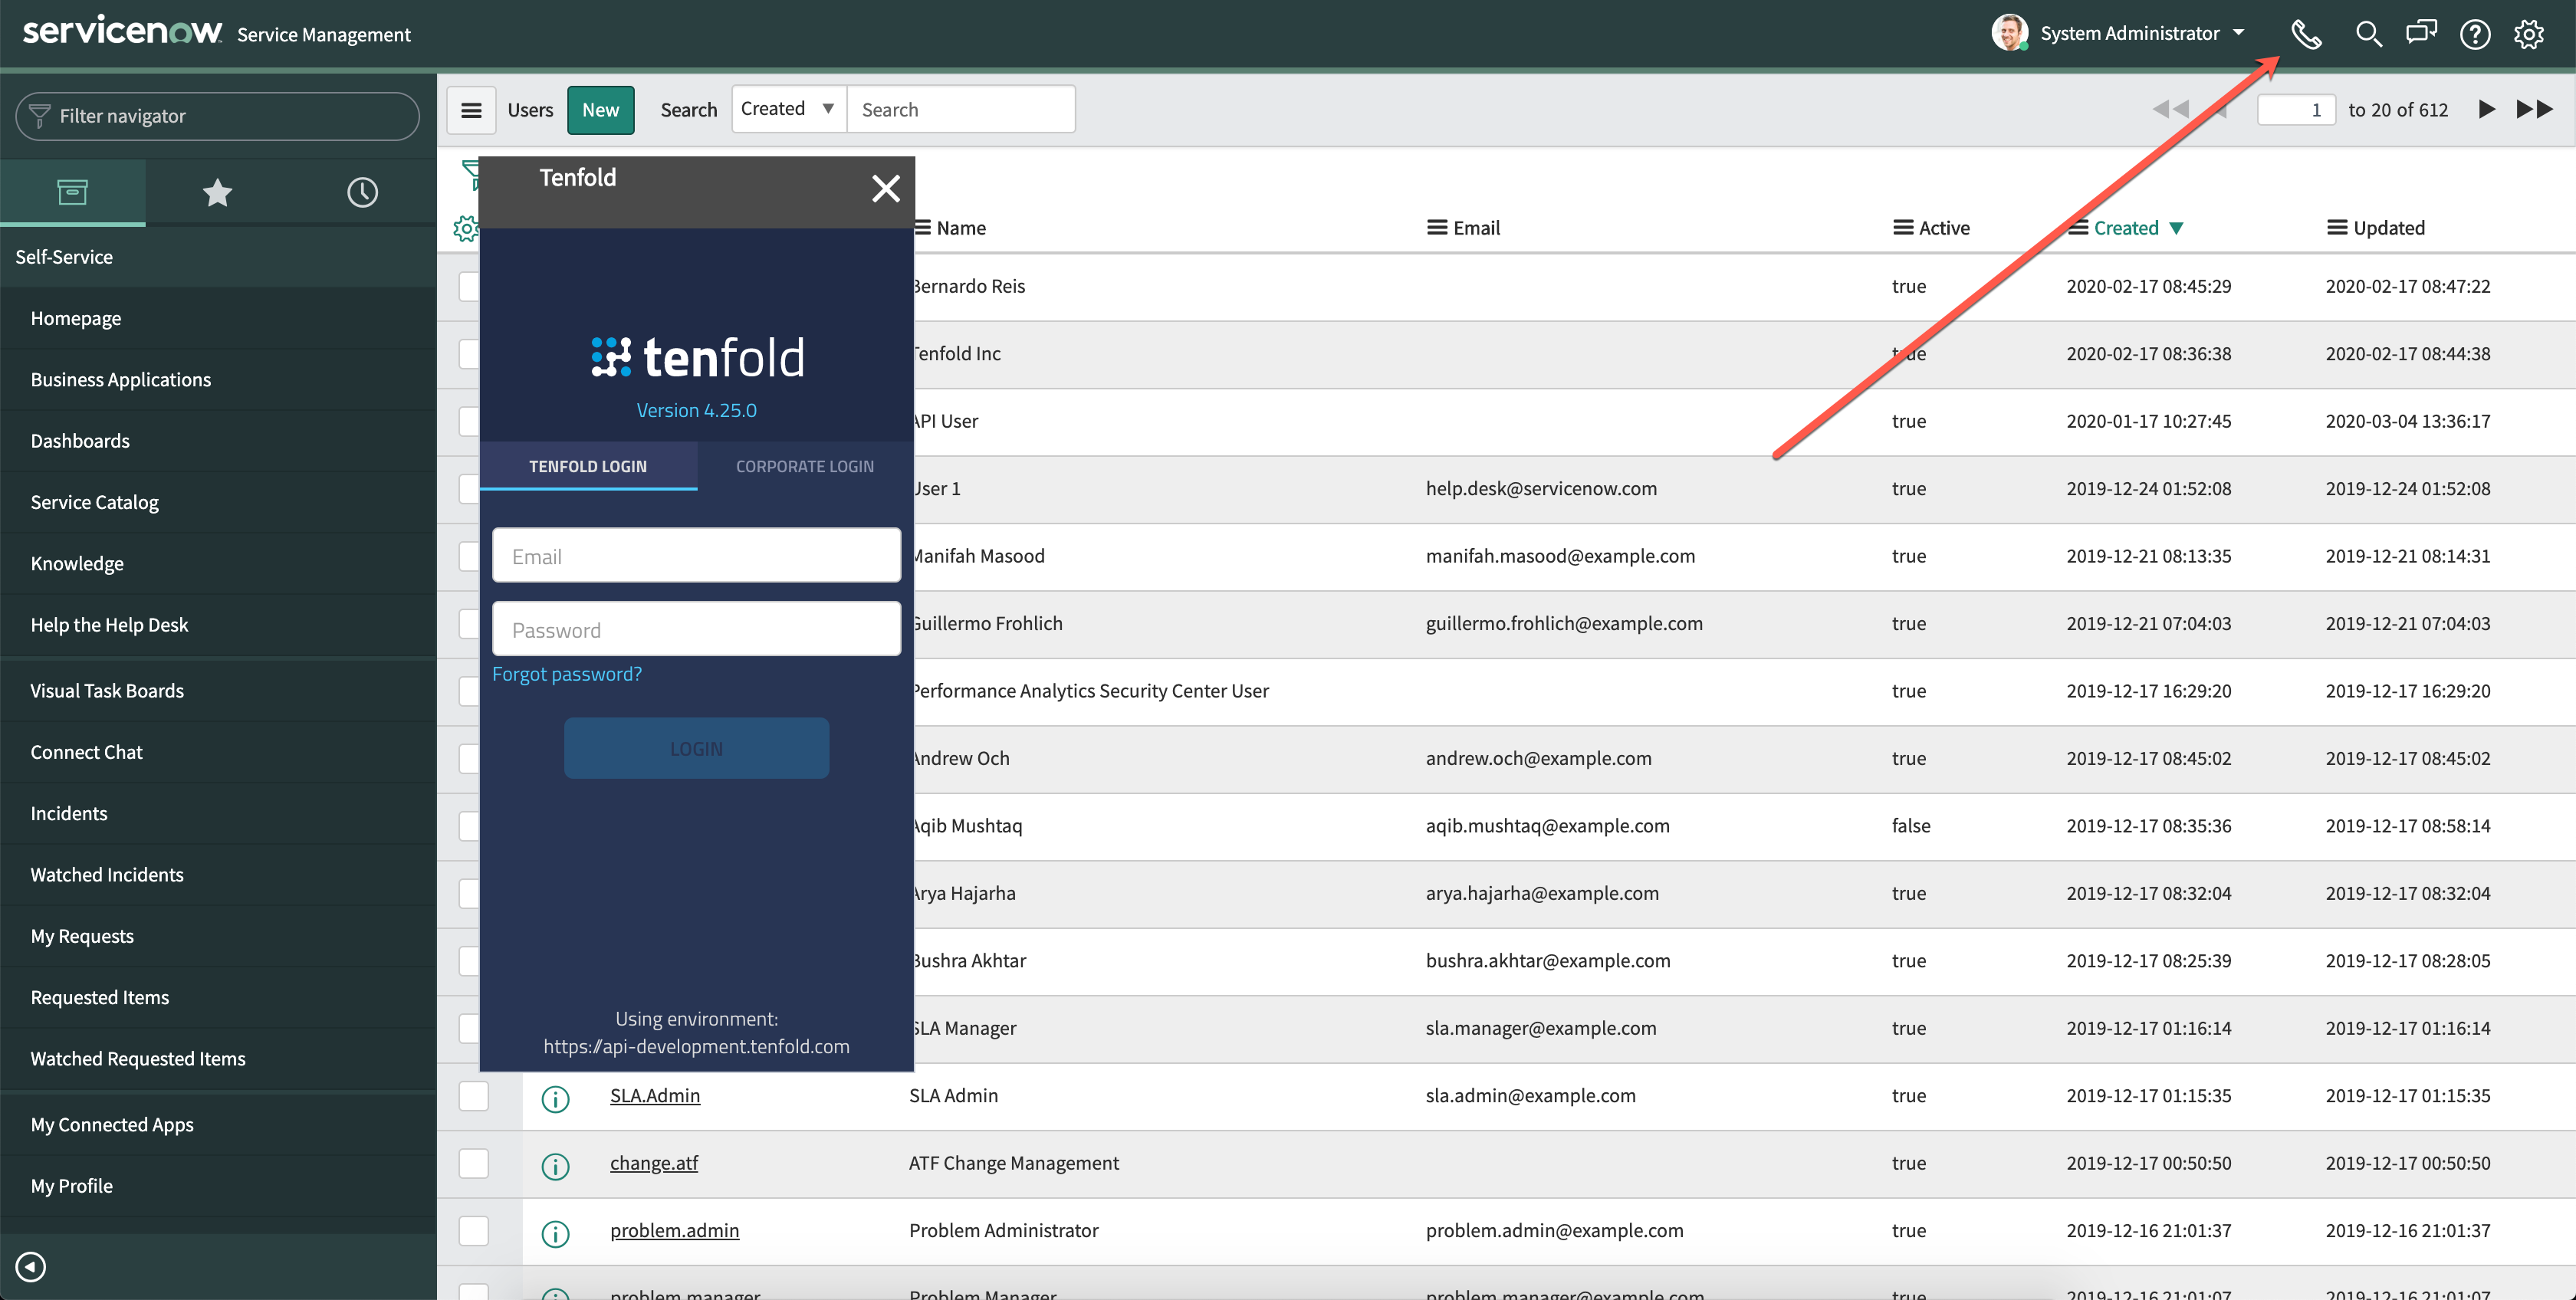
NOTE: You may need to clear your browser cache if the Tenfold UI does not display after completing this step.
Important
Depending on your security restrictions in your ServiceNow instance, you may have to also check
glide.ui.concourse.onmessage_enforce_same_originand toggle the value fromtruetofalse.
Connect to a Tenfold organization
The following section describes the steps for connecting Tenfold Cloud with ServiceNow.
In the ServiceNow instance, go to Application registry (make sure the Tenfold app for ServiceNow is installed first):
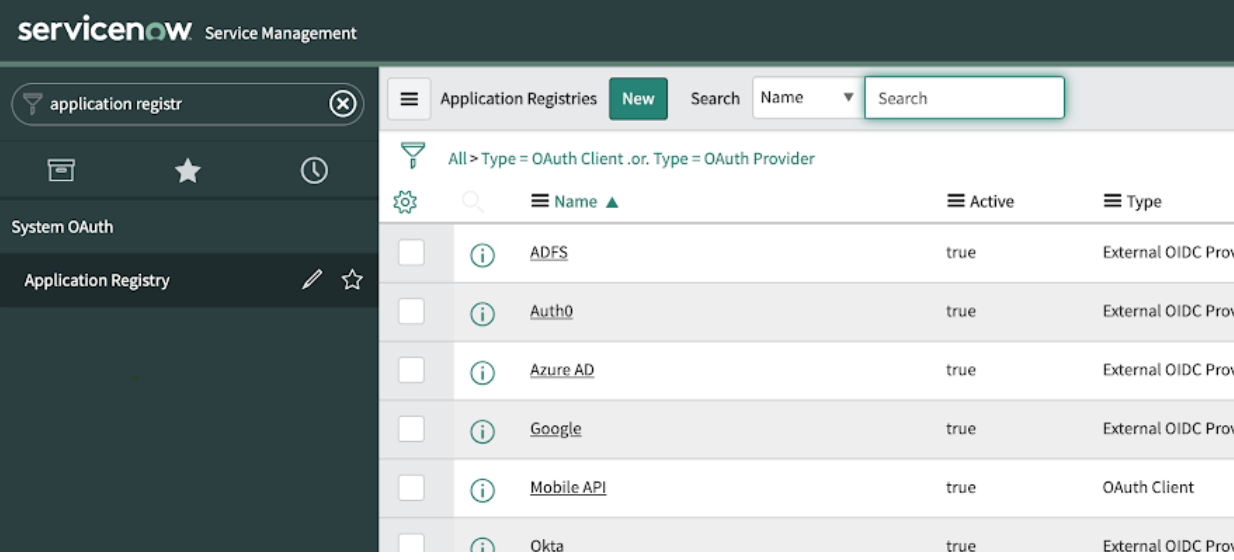
Create an OAuth client:
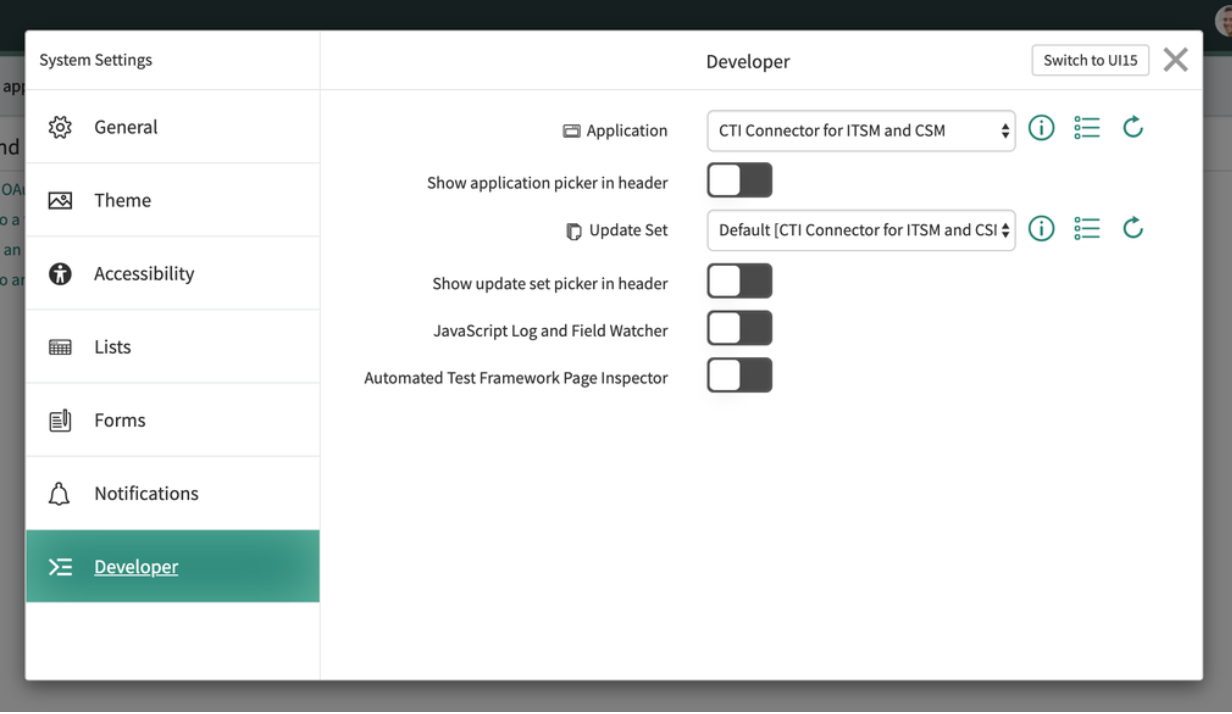
Make sure the application that should be related to the OAuth Client is selected by following these steps:
Click the gear icon at the top right corner.
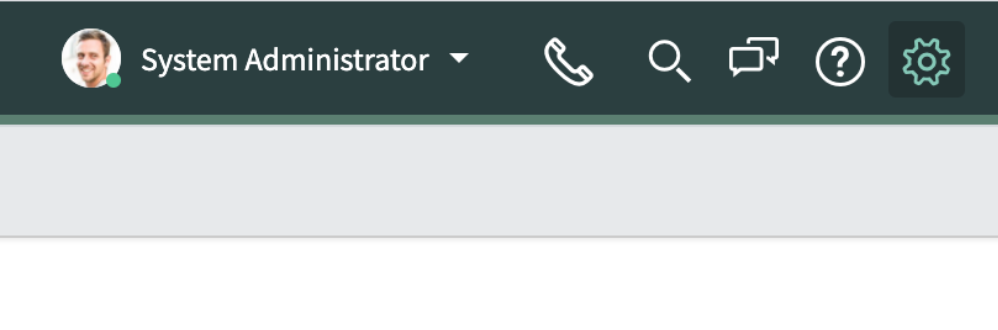
Click the Developer tab and make sure the correct application is selected in the “Application” dropdown
In the navigation filter, type “Application Registry."
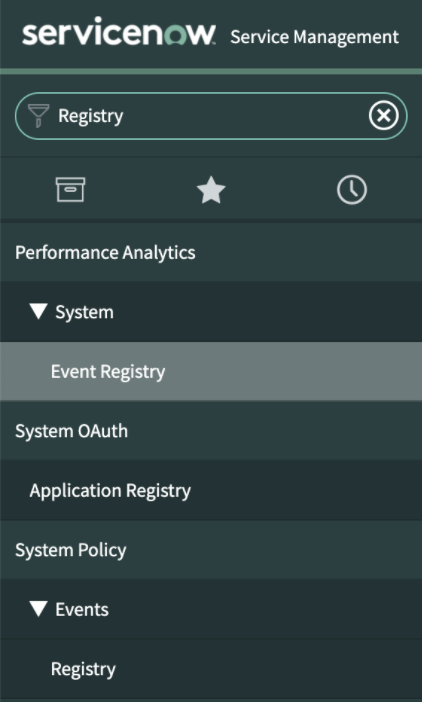
Click New.
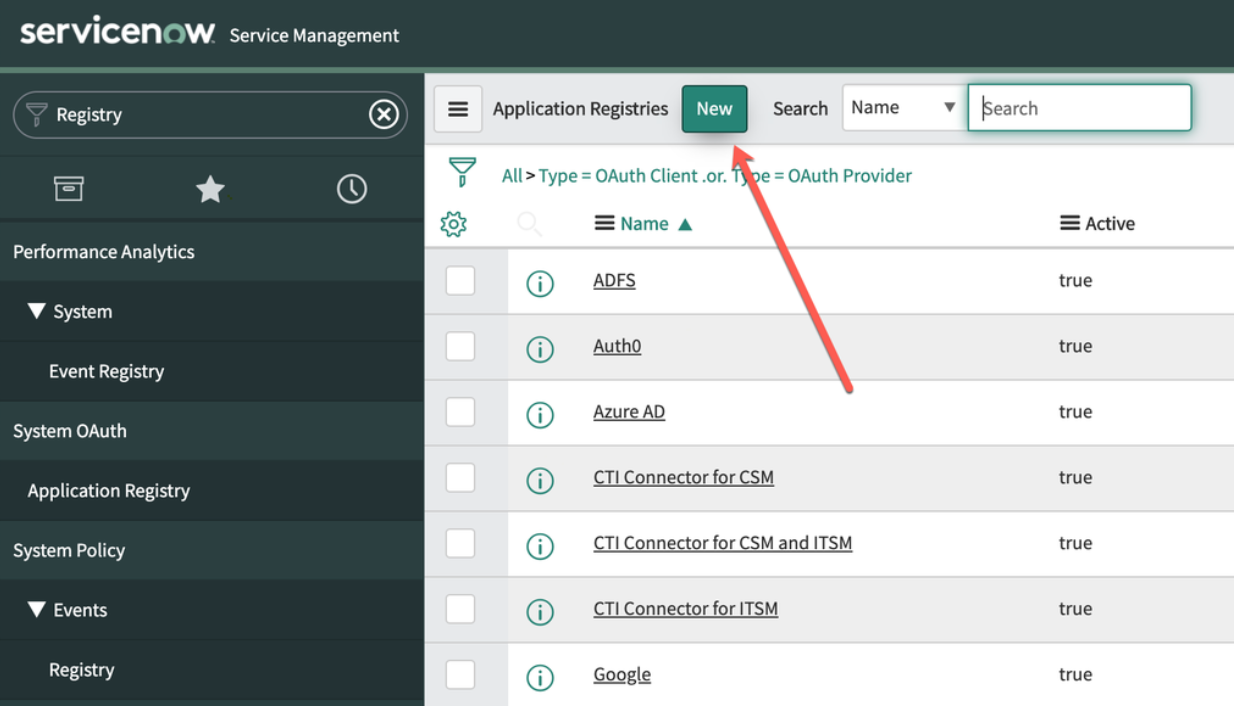
Click Create an OAuth API endpoint for external clients.

Complete the fields as follows:
Title
Description
Name
Enter a value such as “Tenfold for ServiceNow."
ClientID
Auto-generated
Client Secret
Can be manually provided or left empty. If left empty, ServiceNow will generate a random password when the form is saved.
Redirect URL
must follow this template: {API_URL}/v1/third-party/oauth/servicenow/cti-connector/callback, where API_URL is the production URL for the API. For Tenfold, the API_URL is https://api.tenfold.com.
Example:
https://api.tenfold.com/v1/third-party/oauth/servicenow/cti-connector/callback
Logo URL
Not Required; can be any image. That image is used in the authorization screen as in this example:
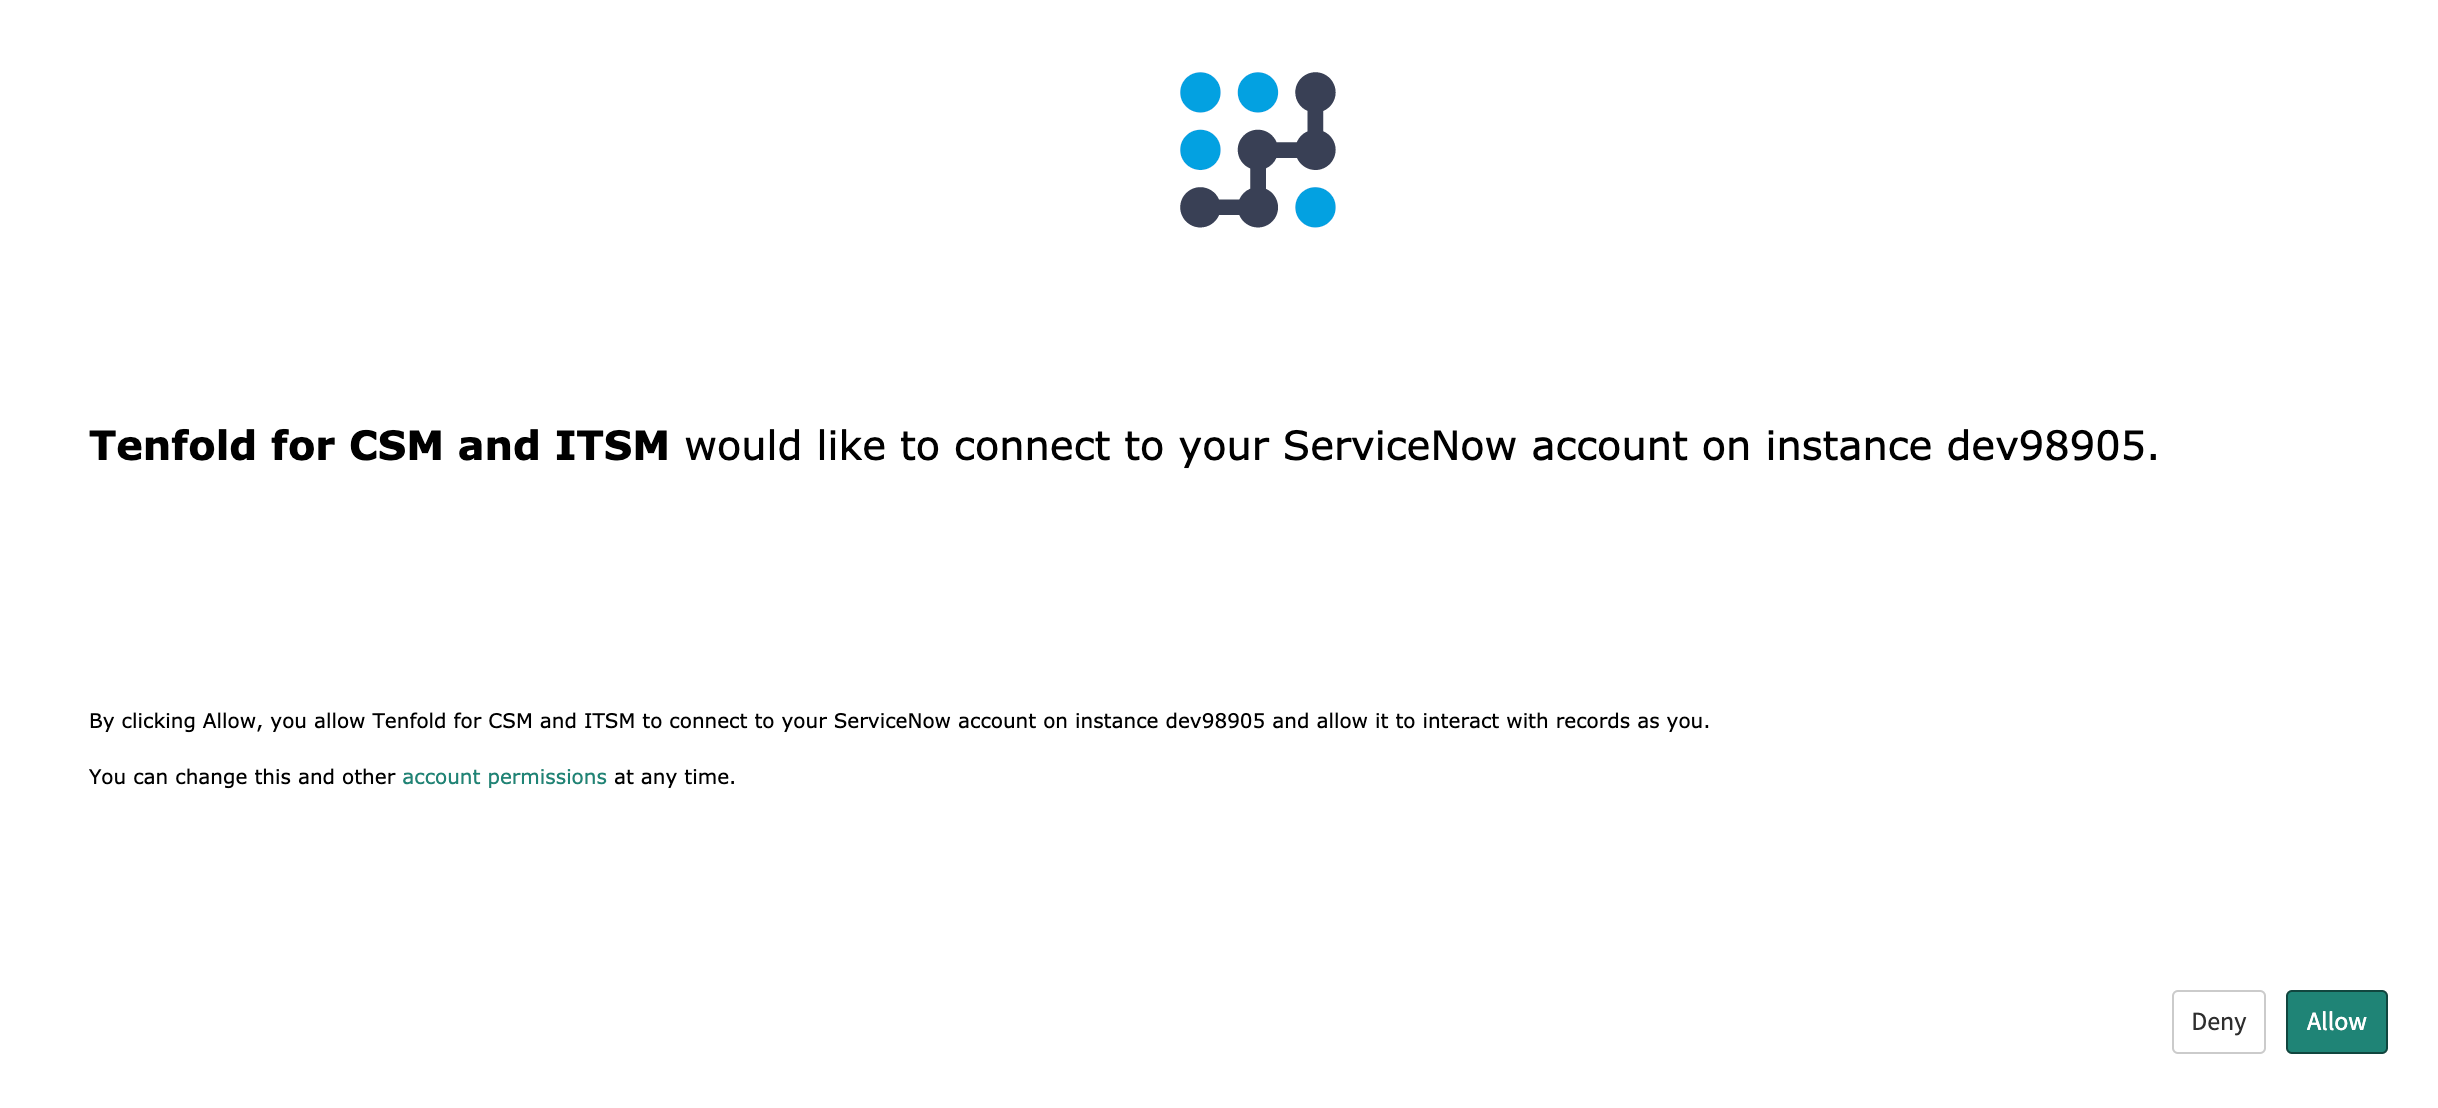
Select the OAuth client (in this case Tenfold for CSM and ITSM):
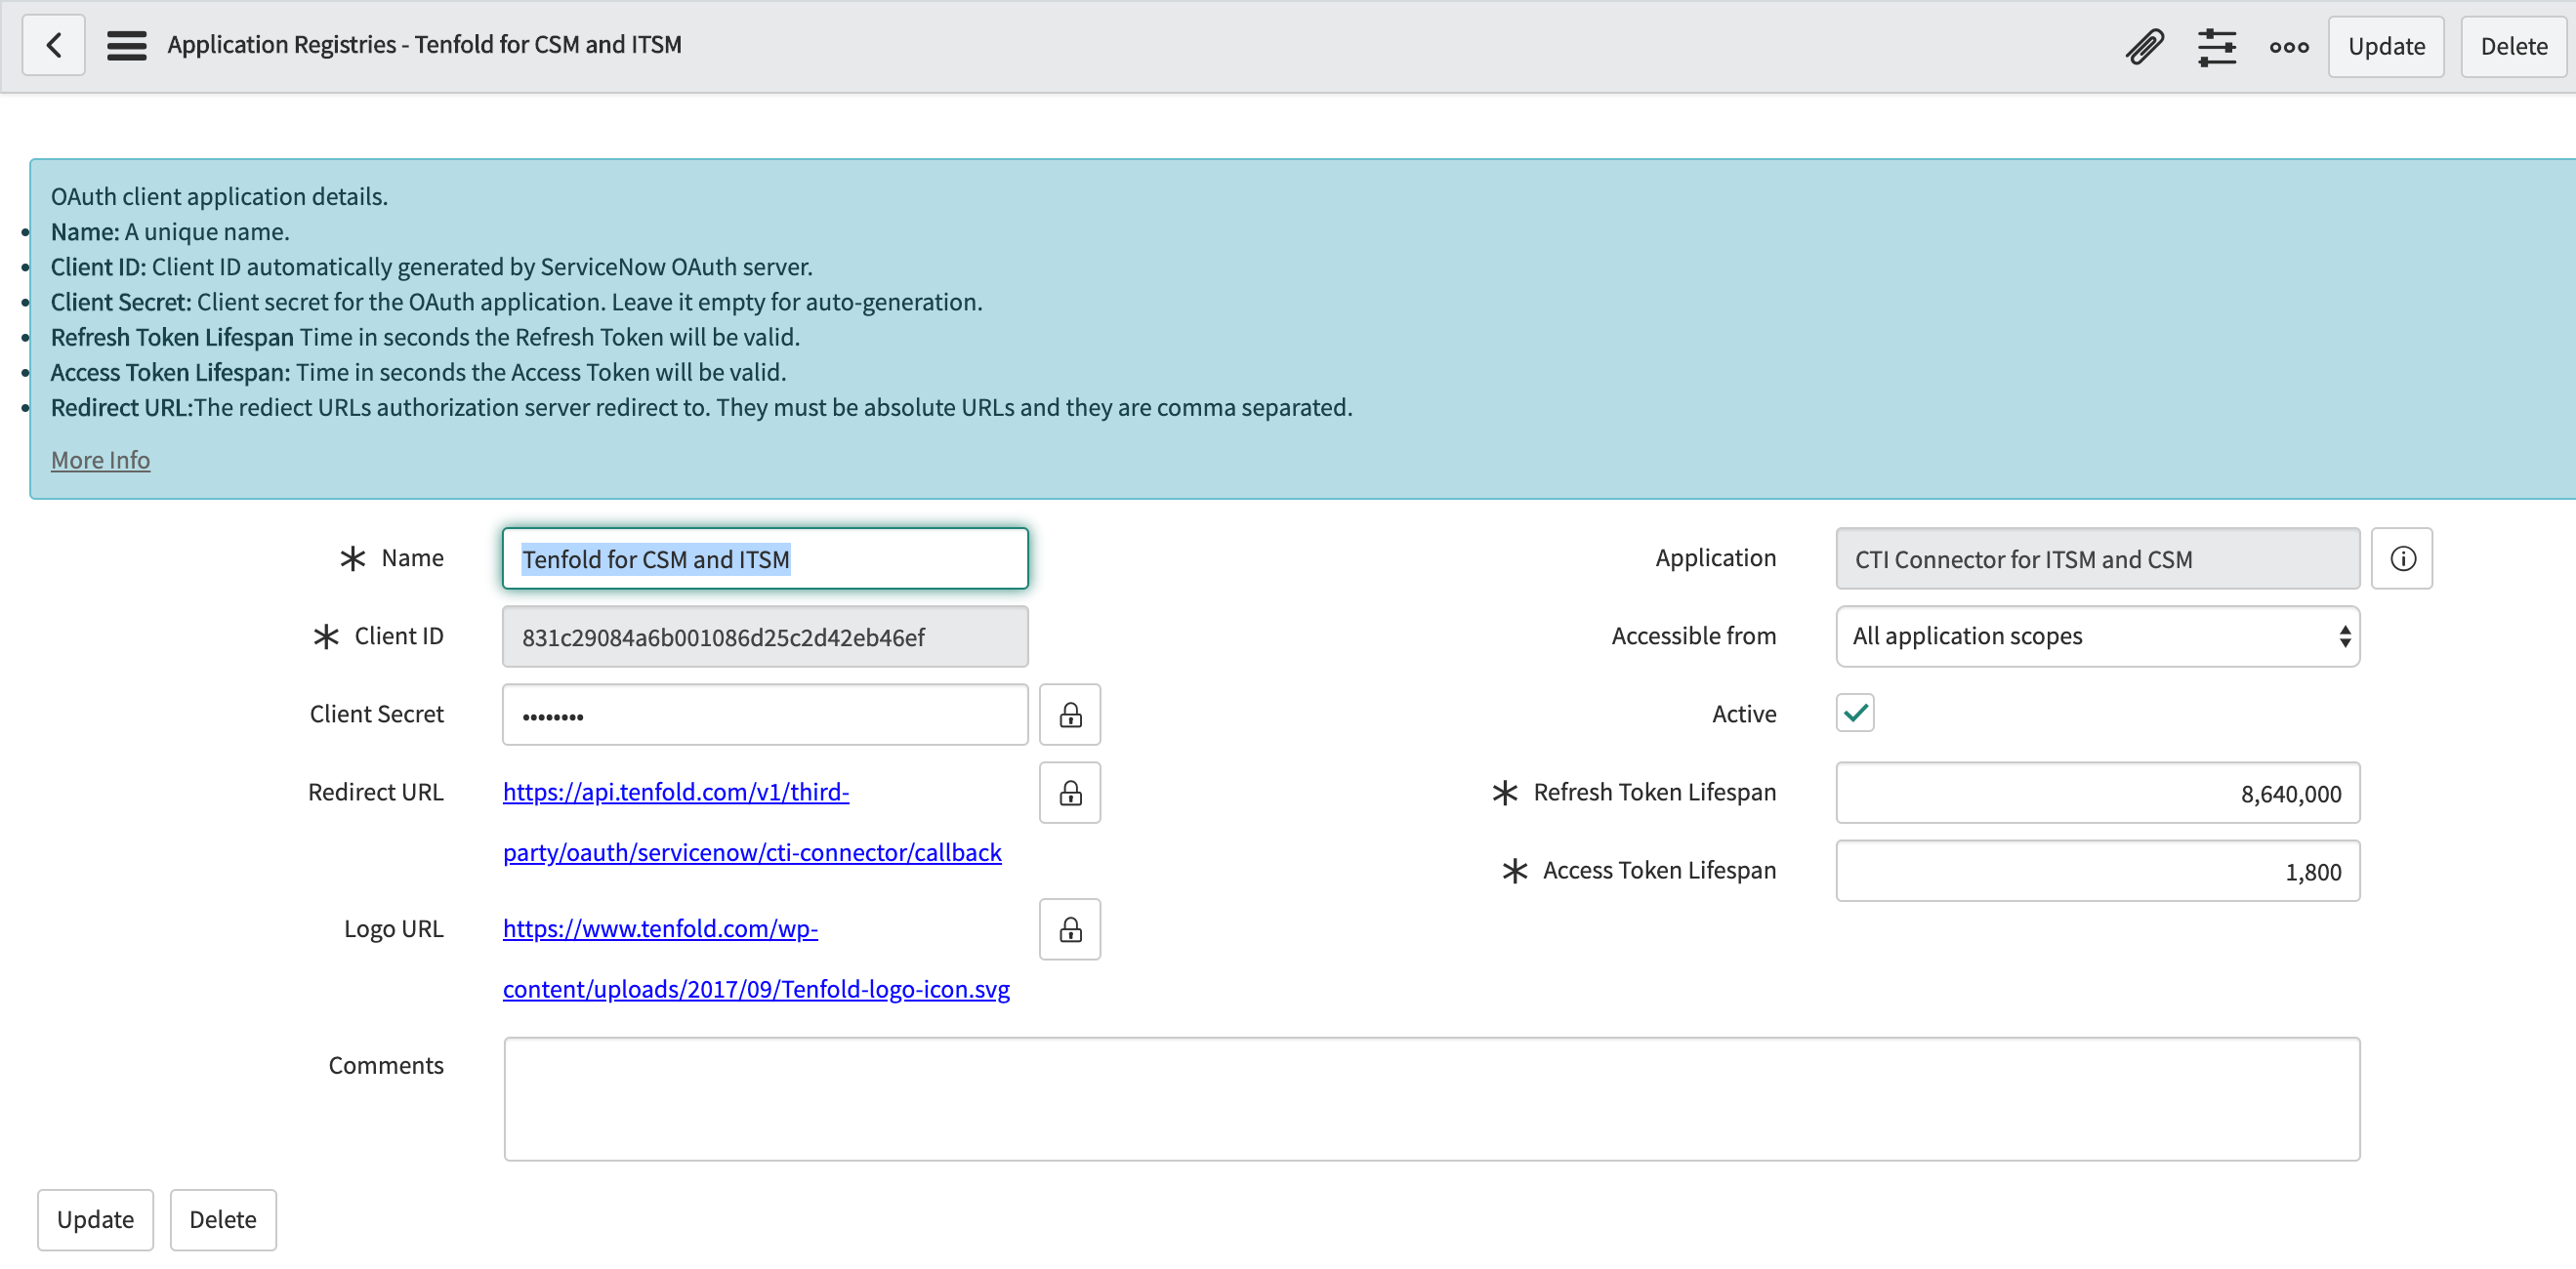
Write down the client ID and client secret (click the lock icon to see the client secret). This information will be input into Tenfold Dashboard.
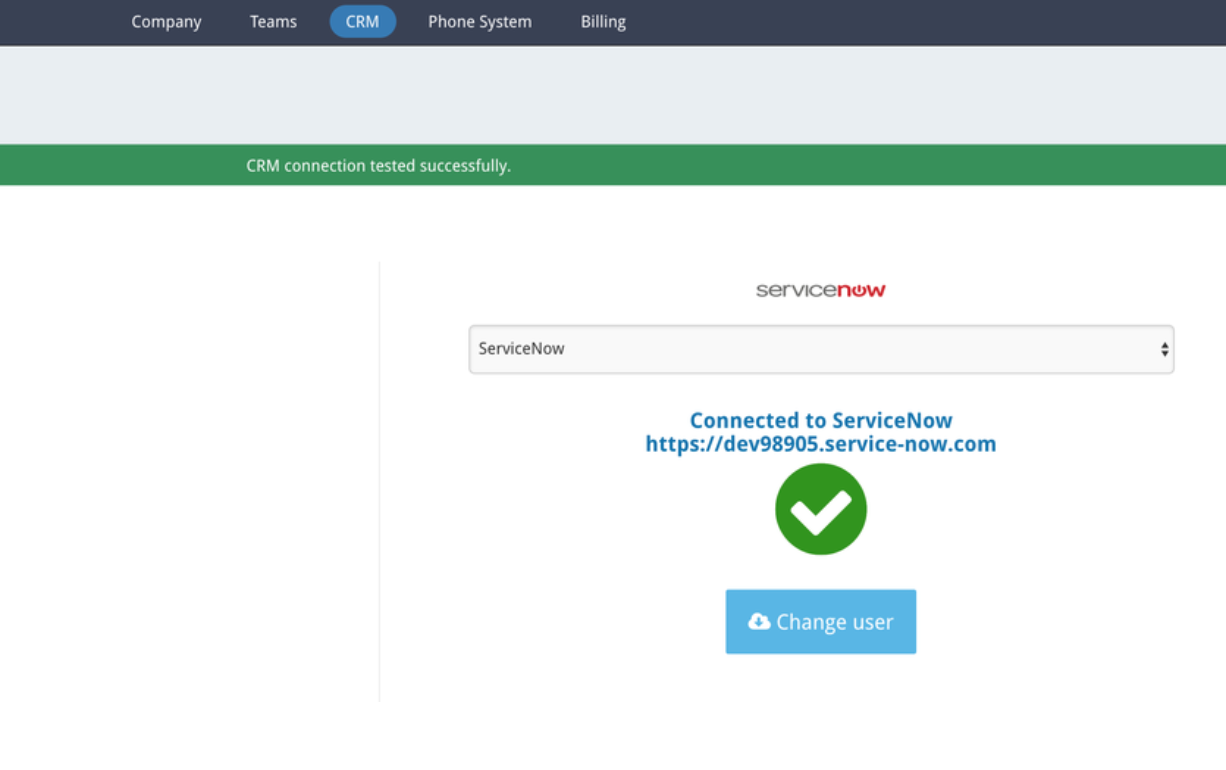
Navigate to Tenfold dashboard > Company Settings > CRM.
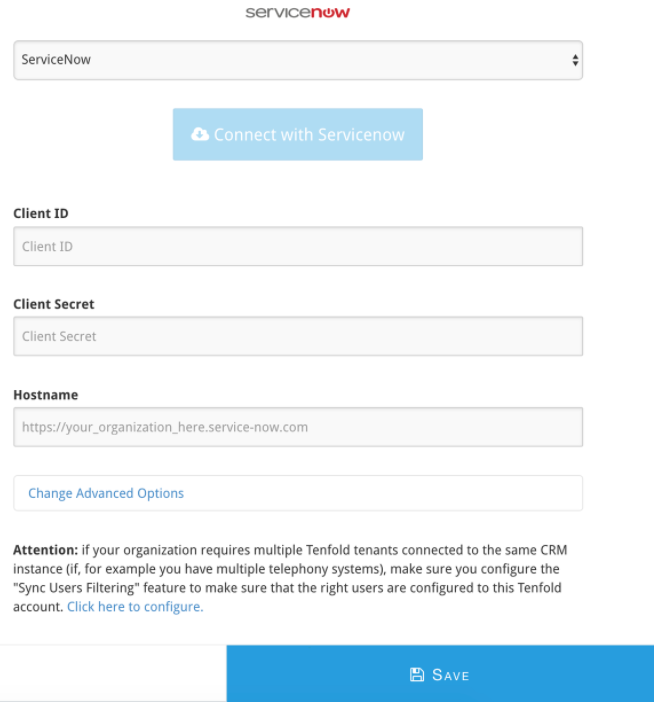
Fill the form with the Client ID, client secret captured 3. Additionally, provide the host name for your ServiceNow instance and then click Save.
Click Connect with ServiceNow. This takes you to ServiceNow to allow the OAuth client.
If you are not currently authenticated to ServiceNow, you will be asked to do so.
Log in when prompted.
Click Allow.

You will be taken back to Tenfold dashboard. The success message shown below displays if authentication succeeded
Sync users
The Tenfold Dashboard can sync users with the customer CRM. What that means is that we will pull users from the customer CRM, compare with the users existing in our database and do the following three operations:
Create users that exist in the CRM and not in Tenfold
Update Tenfold users that match users from the CRM
Remove users that exist in Tenfold but not from the CRM
ServiceNow stores customers and agents in the same table (called Users [sys_user]. Contacts, added by the CSM plugin, extend sys_user). For this reason, Tenfold filters users by role when synchronizing with Tenfold Dashboard. The following roles are the defaults which Tenfold uses to synchronize:
itil- Role added by the ITSM pluginsn_customerservice_agent - Role added by the CSM plugin
Customers can provide custom roles they might use to identify their agents through the Additional Roles field inside the advanced CRM settings:
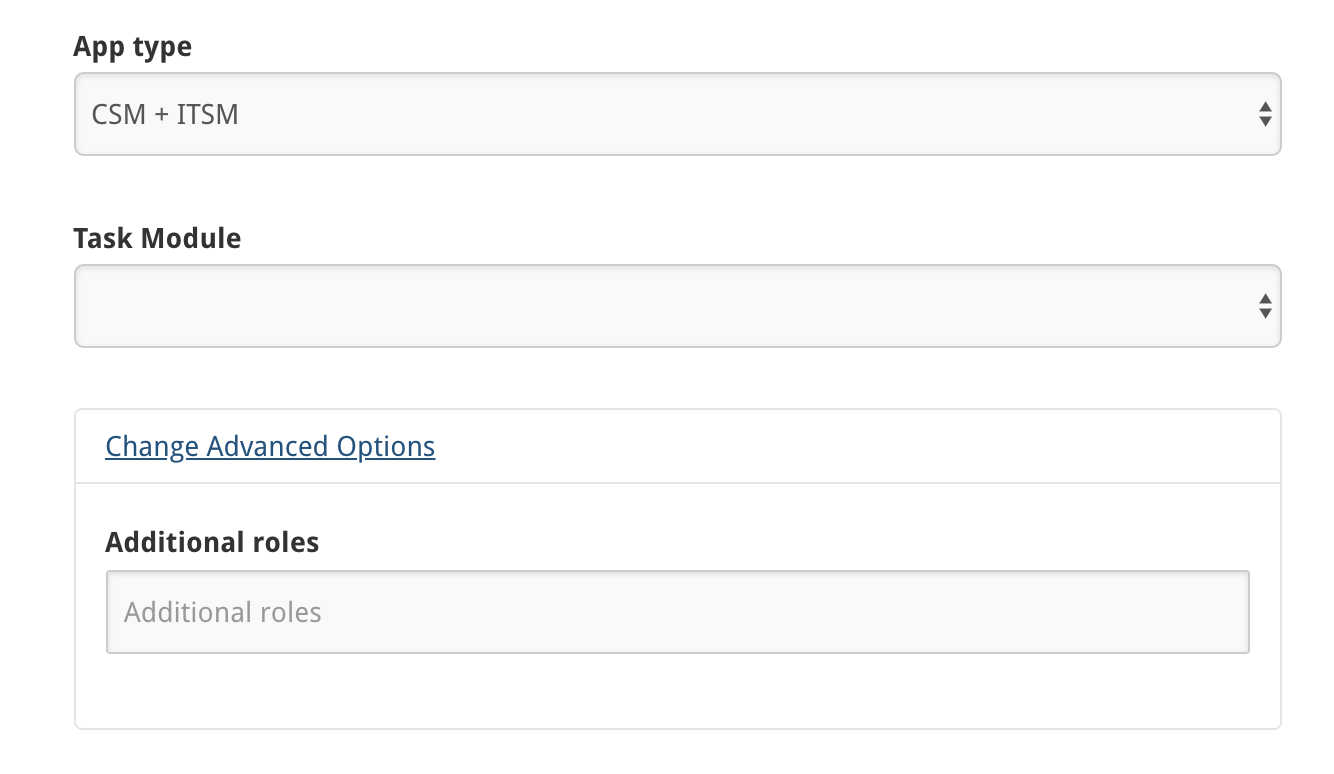 |
To provide additional roles, the customer must provide a comma-separated string:
role_1,role_2,role_3
The net of this being that Tenfold queries the CRM for users who have
the
itilrole (if ITSM is installed) ORthe
sn_customerservice_agent(if CSM is installed) ORhave one of the custom roles (if provided)
Resolve permission errors
If you encounter error messages relating to ServiceNow permissions, refer to Resolve ServiceNow integration permission errors.
Perform additional tasks
Links to additional procedures you may need to perform after completing the installation:
Useful links
NOTE: For version-specific links, Rome documentation is used as an example. If you are using a different version of ServiceNow, search for the same page in your product version documentation.