Oracle NetSuite integration guide
Version 2020.1
Audience
This document is directed to customers and prospective customers interested in using Tenfold in an Oracle NetSuite environment. Those who will perform the procedures described in this guide should have a basic level of familiarity with NetSuite APIs, NetSuite administration, general networking, and Tenfold.
Goals
The goal of this document is to provide knowledge, reference, and procedural information necessary to configure a proposed NetSuite/Tenfold integration.
This document is NOT intended as a specific system or network design document. If further clarification is needed, consult with your Tenfold Customer Success Manager (CSM) and/or Tenfold Support Engineer (TSE).
Terminology
To ensure a common frame of reference, this guide uses the following terms in conjunction with this NetSuite integration:
Application Programming Interface (API): A set of clearly defined methods of communication used by Tenfold for reading and writing data.
RESTlet: NetSuite scripts that interact with HTTP data following representational state transfer principles. RESTlets extend the SuiteScript API to allow Tenfold to integrate with NetSuite and improve performance.
Tenfold Cloud: A set of Web Services that receives events from the telephony system and takes further action such as querying and saving to the CRM.
Tenfold API User: This is the Tenfold Dedicated NetSuite Employee we create in the steps of this Implementation to interact with the Tenfold Cloud.
Tenfold User Interface (UI): The Tenfold Product/Application Agents will be using. There are Chrome Browser and Desktop versions that can be used with the NetSuite Integration.
Role: A defined access configuration that can be assigned to users/employees. This is the first thing we will create in Implementation and will set the permissions our Tenfold API user needs in order to interact with any of the NetSuite Entities or Records the Tenfold User Interface will be working with.
Web Service Preferences: (Also known as SOAP Web Services) An object access protocol we can use to link the Tenfold API User and Role to its respective Role ID and Account ID. We suggest dedicating a Role and Employee to the Tenfold Integration as using a regular Admin User will complicate concurrency calls, notifications, and deliver excessive permissions that Tenfold may not need.
OAuth: (Also known as Token Based Authentication) This is a way to connect NetSuite and Tenfold with an access token that is refreshed using a Client ID and Secret. This is preferred so no sensitive access data like login credentials need to be used.
Customer responsibilities
You are responsible for supplying connectivity to NetSuite, and for obtaining and loading any licensing required by NetSuite. You are also responsible for configuring NetSuite to support the Tenfold integration. Responsibilities for NetSuite management include, but are not limited to: Maintaining a customized Role and dedicated Employee/User in NetSuite with the minimum amount of permissions required to interact with NetSuite Objects outlined in your contract, sustaining a Web Service ID committed to the mentioned Role & Employee, also maintaining the RESTlet script deployments.
Integration overview
NetSuite requirements
Connection
Accessible via TCP port 443 (https) to Tenfold Cloud
Dedicated Service Account (i.e. API User)
Required version
NetSuite 2020.1 or higher
Other considerations
If using a highly custom built release of NetSuite, please consult with Tenfold to understand supportability.
Installation and configuration steps summary
Make the NetSuite role.
Make the NetSuite employee.
Make the Web Service Preferences RoleID for both.
Install and deploy the Tenfold RESTlets.
Integrate with the Tenfold Dashboard using employee credentials.
Create the OAuth integration client.
Integrate with the Tenfold Dashboard with token-based authentication.
Permissions requirements
The NetSuite Role that is provisioned for the integration user will require access to specific Lists in NetSuite to ensure a working solution, and that specific actions can be taken via the different series of API calls. The following Lists should be provided “FULL” access to the provisioned role.
NOTE: if delete access is problematic from a security standpoint you should be able to utilize “EDIT” access instead for the Role and Employee Permissions.
Accounts
Contact
Companies
Customers
Phone Calls
Tasks
Employee
Employee Record
Perform Search
Find Transaction
Opportunity
Quote
Estimate
SOAP Web Services
REST Web Services
User Access Tokens
Installation requirements
Service Account Email | Email used for the dedicated Employee (the one made in the CRM) |
Service Account Password | The password for the Employee we made (i.e. API User) |
Account ID | Your NetSuite Account ID* (CRM URL before “.app.netsuite.com”) |
Role ID | Your NetSuite Role ID*(Generated in SOAP Web Services) |
RESTlet Script Endpoints | The endpoint URLs for the (4) provisioned RESTlet scripts deployed in NetSuite environment (Load, Search, Upsert, and Main Endpoints) |
* More information on obtaining your Account ID and Role ID can be found at:
Installation process
Step 1: Provision a service user in NetSuite for API Connection
This section provides the procedural steps to set up token-based authentication in NetSuite to provide a secure connection from Tenfold to NetSuite.
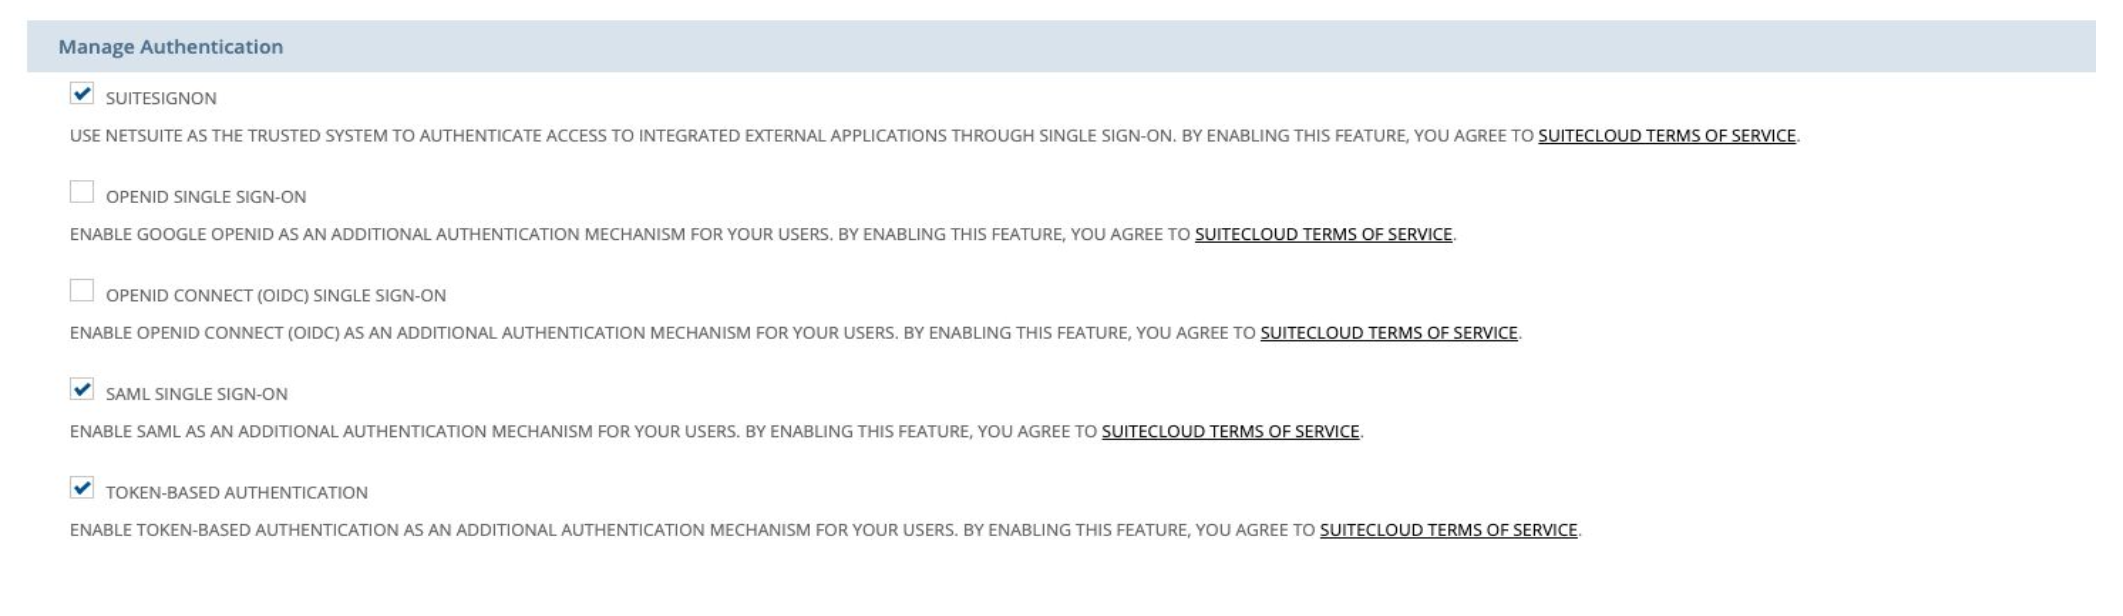
Enable Token-Based Authentication in the account.
Go to Setup > Company > Enable Features and then navigate to the SuiteCloud subtab. Enable the required features as shown:
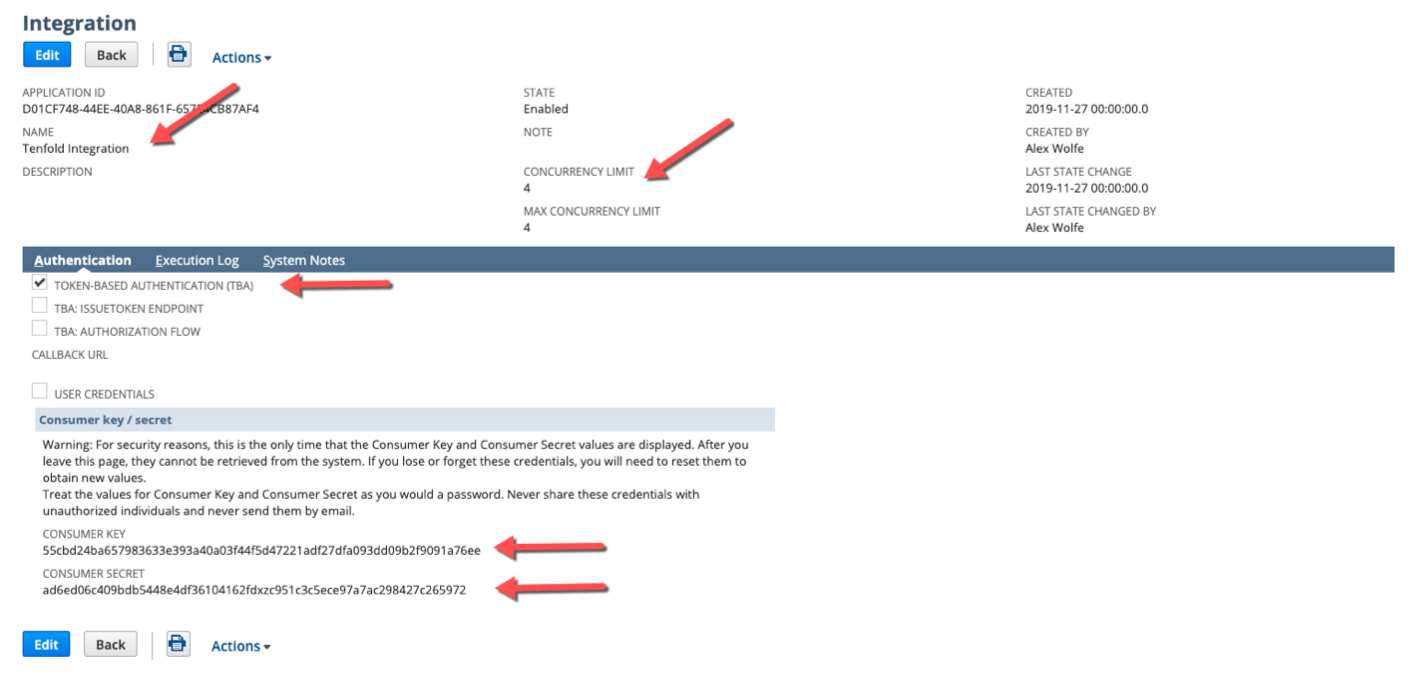
Create an integration record.
An integration record is required for authentication before it can connect with a token. A new integration should be used. Create it by navigating to Setup > Integration > Manage Integrations > New and complete the following:
Set the name to "Tenfold Integration" and select Token-Based Authentication.
If you already have an integration record for Tenfold Integration, you can reuse it by editing the integration and selecting Token-Based Authentication.
Copy the Consumer Key and Consumer secret values. You will use these later in the user role configuration.
Important
The Consumer Key and Consumer Secret values display only once, so it is very important that you copy them before going to another page.
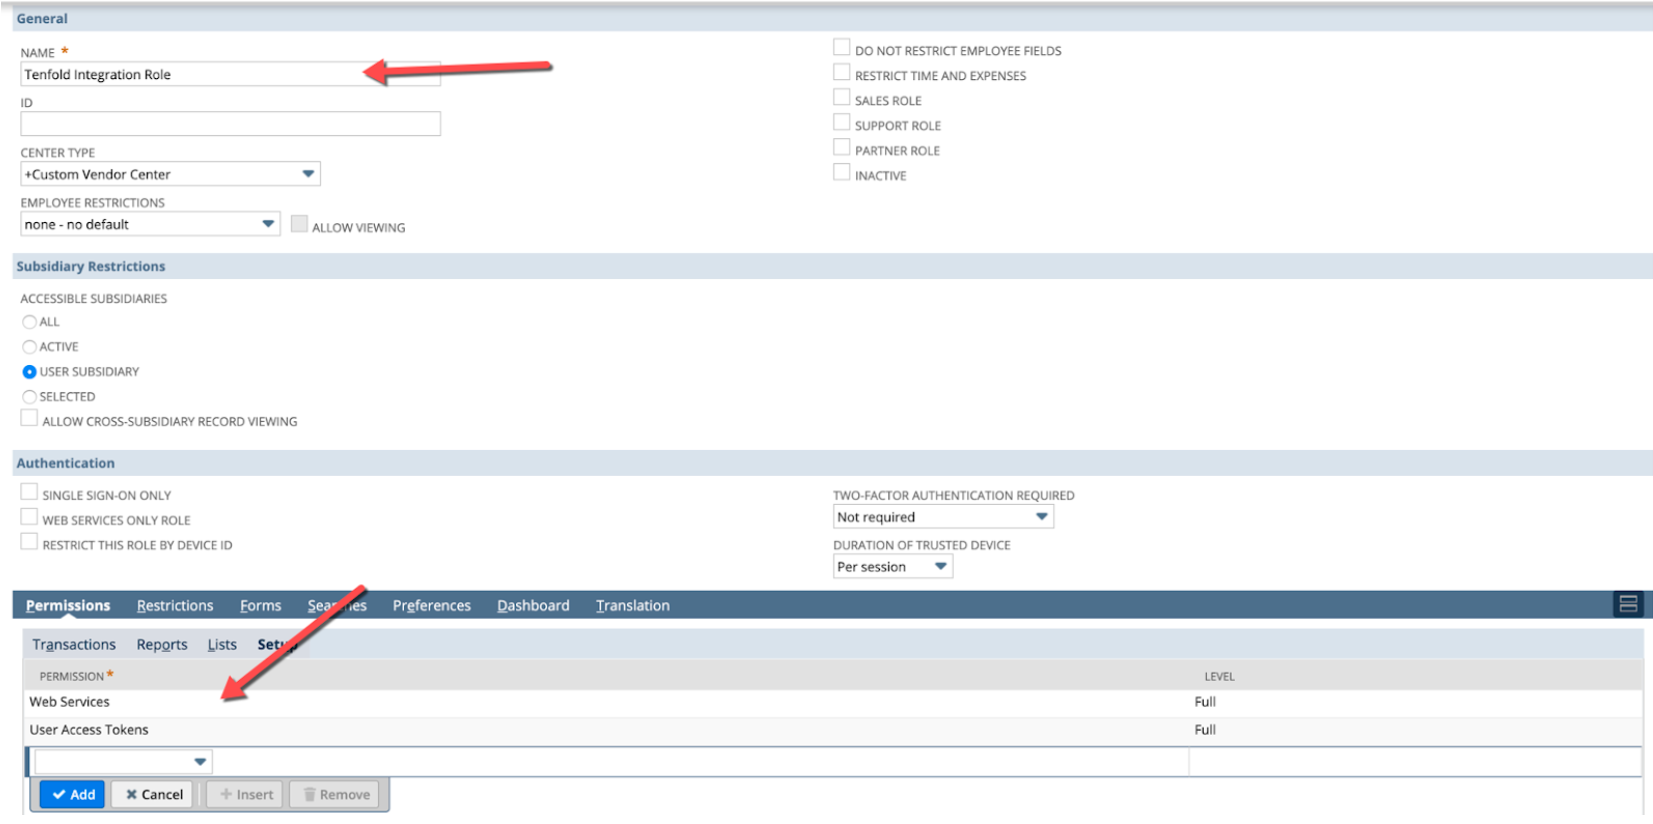
Set up the role.
Token-based authentication is a per-user authentication and requires certain permissions in NetSuite. You can use an existing role (recommended) or create a new role.
Access Token Management:Users with this permission can create, assign, and manage tokens for any user in the company.
Users with this permission cannot use token-based authentication to log in to the NetSuite UI.
Login using Access Tokens:Users with this permission can manage their own tokens using the Manage Access Tokens link in the Settings portlet, and they can log in using a token.
User Access Tokens:Users with only this permission can log in using a token, that is, they can use tokens to call a RESTlet.
Users with only this permission cannot manage tokens or access pages where tokens are managed.


Step 2: Create an Access Token for the Integration record, User, and Role
With the integration record created and proper role assigned, a token can be created for authentication.
To create a token:
Have the user with the token authentication role login.
Click the Manage Access Tokens link available on the home dashboard under Settings, or go to Setup > Users/Roles > Access Token > New.
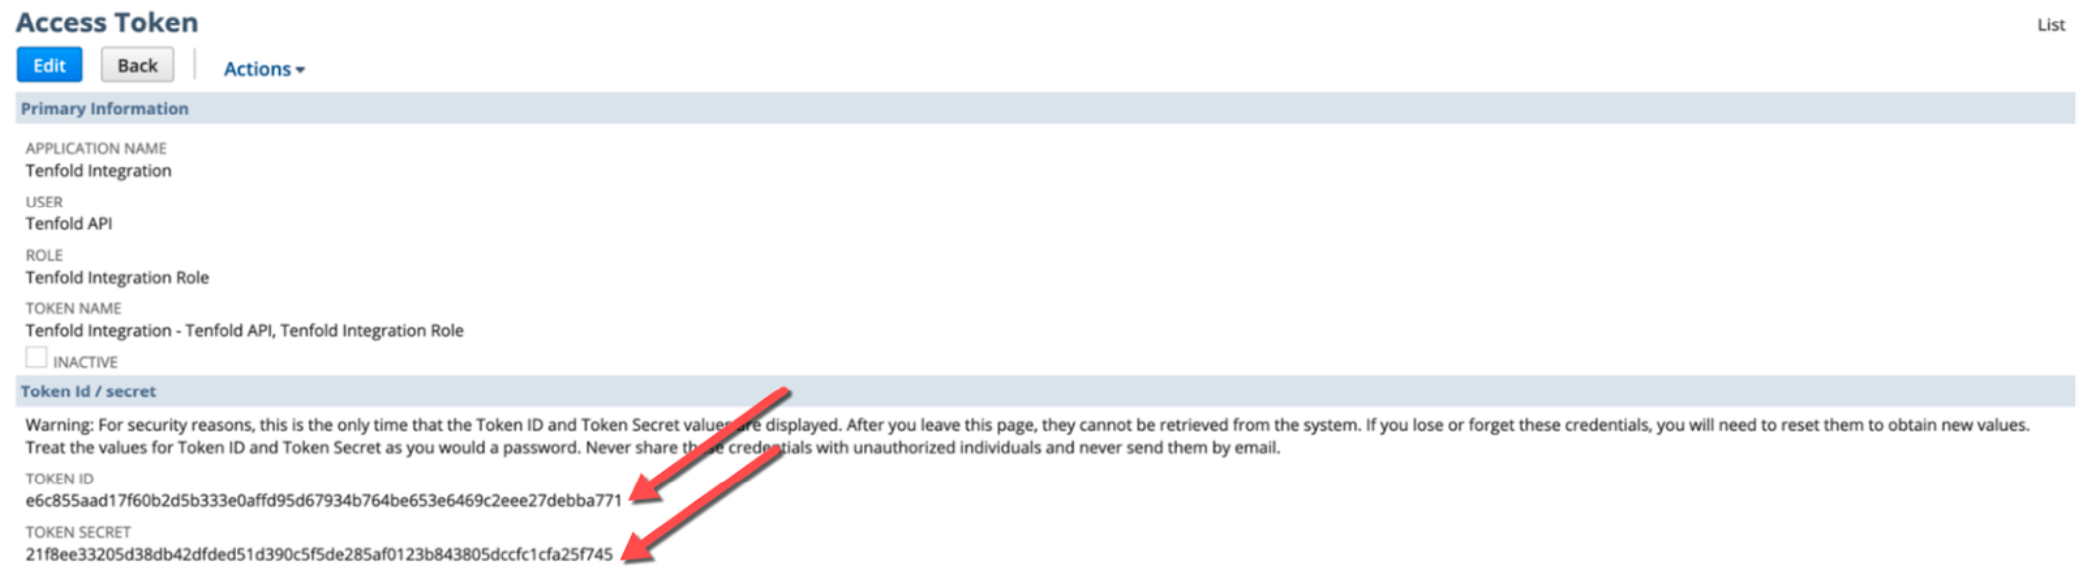
After completing the above steps, you can use the Consumer Key, Consumer Secret, Token ID, and Token Secret in the Tenfold Dashboard to setup your CRM Connection.
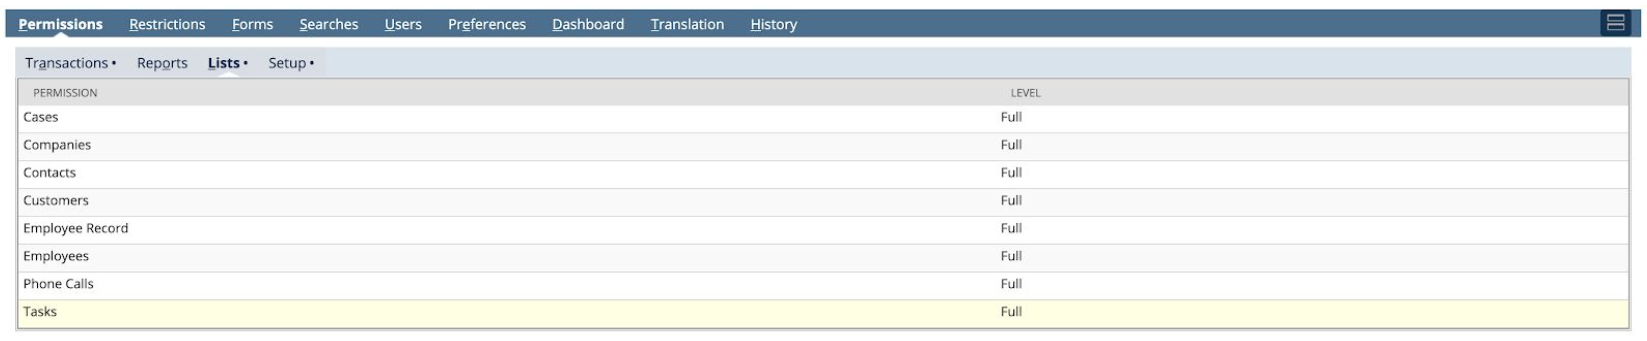
Mandatory minimum permissions set for “Transactions” and “Lists”:
Contact
Companies
Customers
Phone Calls
Tasks
Employee
Employee Record (yes, both)
Perform Search
Find Transaction
Opportunity
Using multiple subsidiaries
If you have more than one subsidiary where objects and documents are stored, you may also need to make sure the API user’s role is given access to all subsidiaries. This can be done by checking the box that says “All” in the Accessible Subsidiaries section.
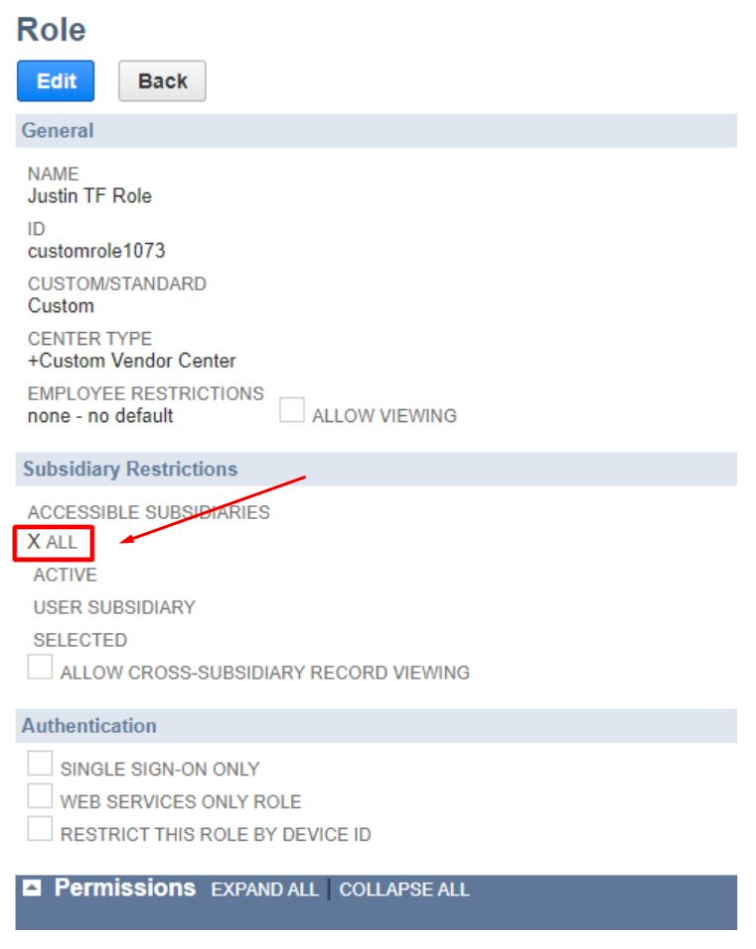 |
If this setting is not enabled, items may be missing from Tenfold search results. If instead your team will only need one subsidiary, you can utilize the User Subsidiary after making sure any objects that will be managed in the Tenfold UI are within the Employee we use to sync’s subsidiary.
Step 3: RESTlet setup
In this step you will provision and deploy the Tenfold RESTlet scripts within your NetSuite environment. The completion of this process will allow for you to configure the script endpoints within the Tenfold system, and greatly improve performance for both read and write operations in NetSuite.
Add the ZIP file with scripts to NetSuite.
Download the NetSuite RESTlet scripts.
You can download the NetSuite RESTlet scripts from the following URL:
https://storage.googleapis.com/tenfold-netsuite-restlet/tenfold-oracle-netsuite-restlet.zip
After downloading the scripts, navigate to Documents > Files > SuiteScripts in NetSuite.
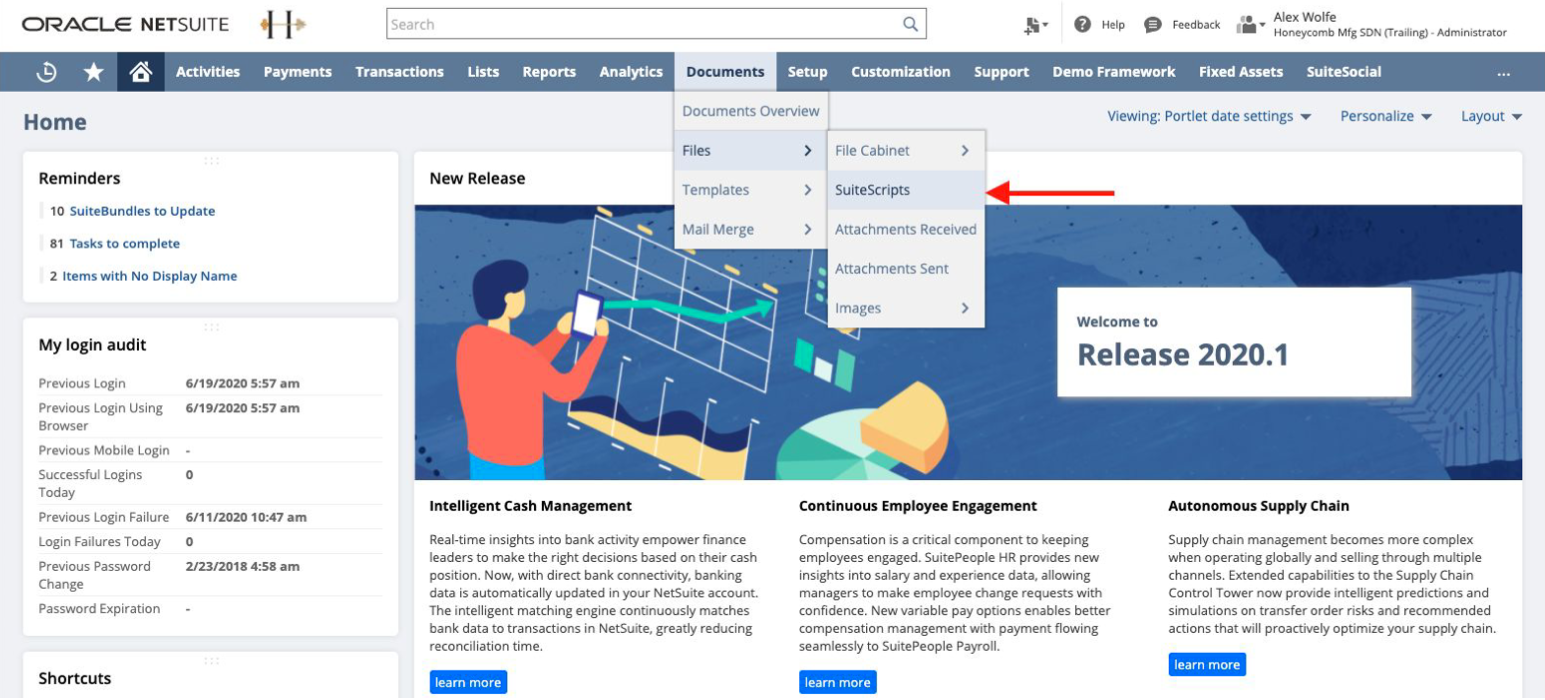
Click Advanced Add.
Under "Zip Archive to Add,” click Choose File and select the
tenfold-oracle-netsuite-restlet.zipfile that you just downloaded.After selecting the “Unzip Files” and the “Overwrite Files With Same Name” checkboxes, click the Add & New button to create a new folder titled “tenfold-restlet.”

The upload will take a moment.
Navigate back to Documents > Files > SuiteScripts to verify the new folder has been created.
Make sure that
load.js,endpoint.js,search.js, andupsert.jsare included in the folder. Also check fornetsuite_toolkit.jsas we will need this for each Script Deployment later.
Set up the RESTlet endpoints for
load.js,search.js,upsert.js, andendpoint.js.You will now generate four RESTlet endpoints corresponding to each of the following uploaded files:
load.js,search.js,upsert.js, andendpoint.js.NOTE: there are other scripts in the RESTlet download, but only these four require endpoints.
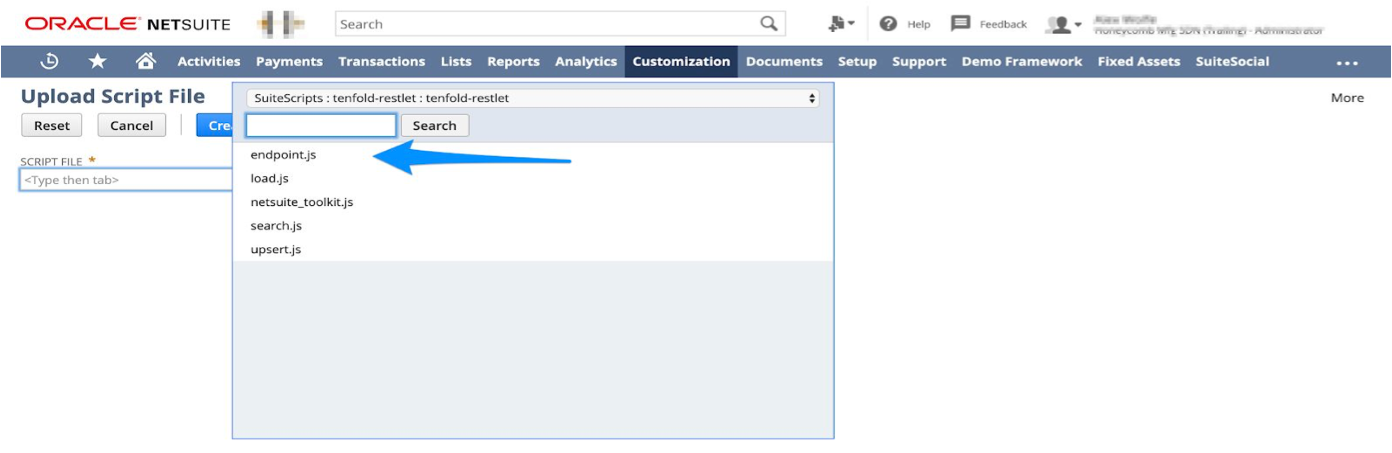
Navigate to Customization > Scripting > Scripts > New.
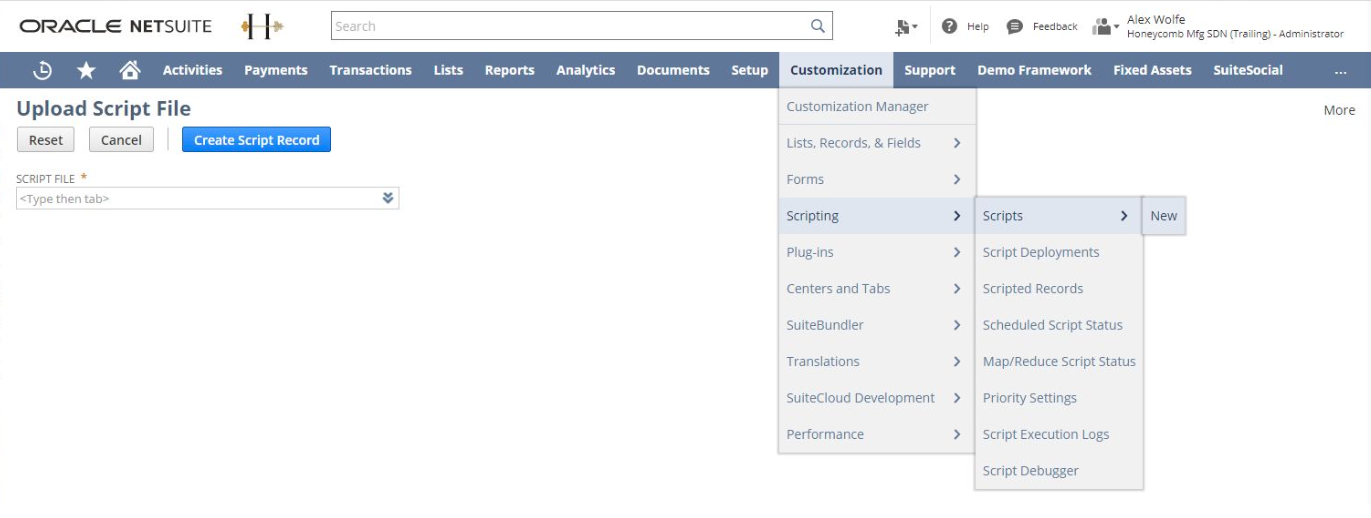
Click the down arrow in the “Script File” field and select List. Within the "-All-" dropdown, select SuiteScripts - tenfold-restlet.
Select the script you are setting up, and then click Create Script Record.
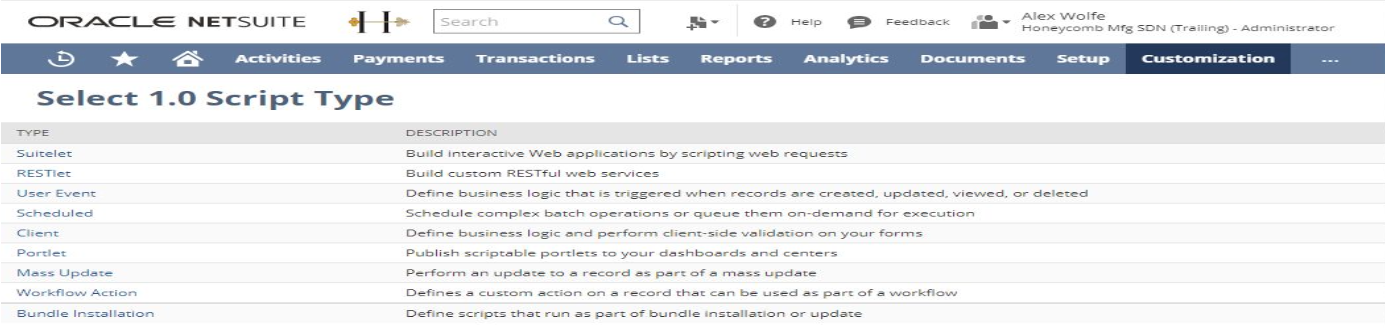
Click RESTlet on the “Select 1.0 Script Type” page.
Name the script “Tenfold <script name>” based on the script you are making (Tenfold Endpoint, Tenfold Load, Tenfold Search, or Tenfold Upsert).
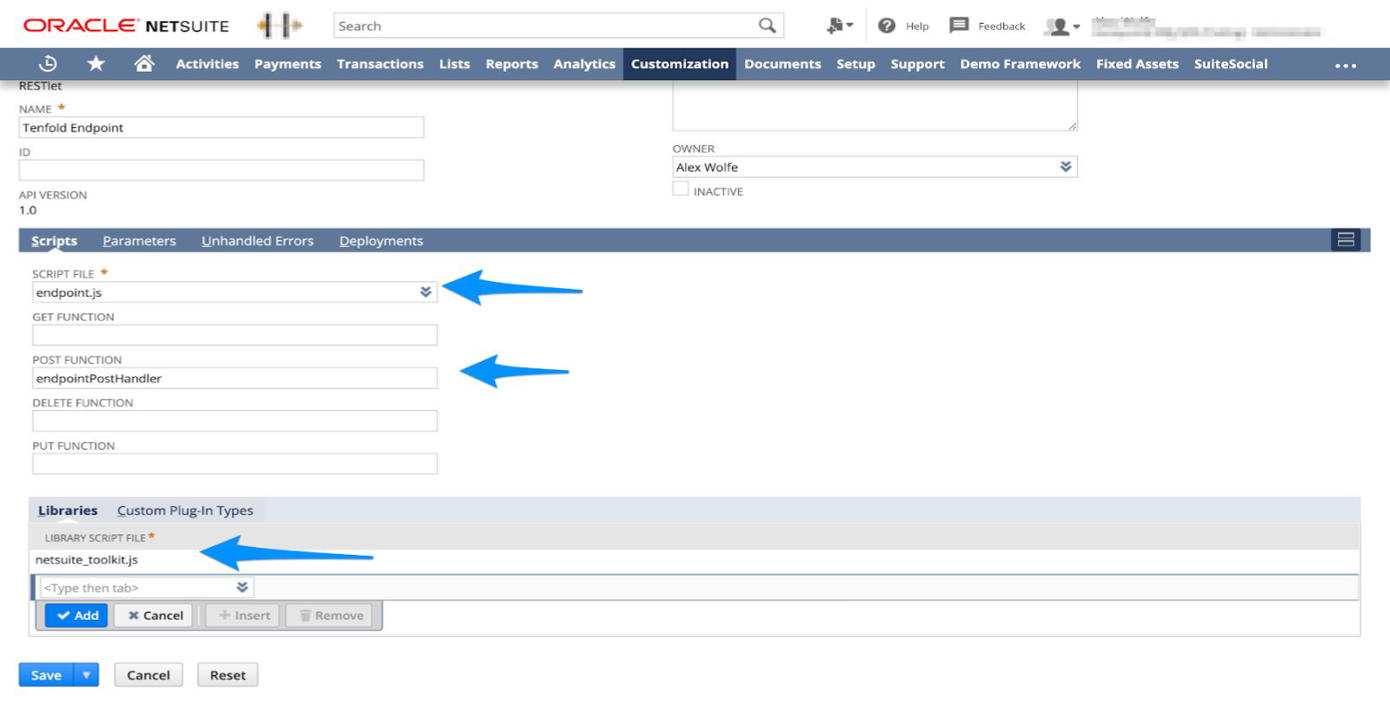
In the “POST FUNCTION” field, input “<script name>PostHandler.”
The corresponding names are shown below. Under “Libraries,” include
netsuite_toolkit.jsfor each of the four scripts.load.js
→
loadPostHandler
search.js
→
searchPostHandler
upsert.js
→
upsertPostHandler
endpoint.js
→
endpointPostHandler
Click Save and then Deploy Script.
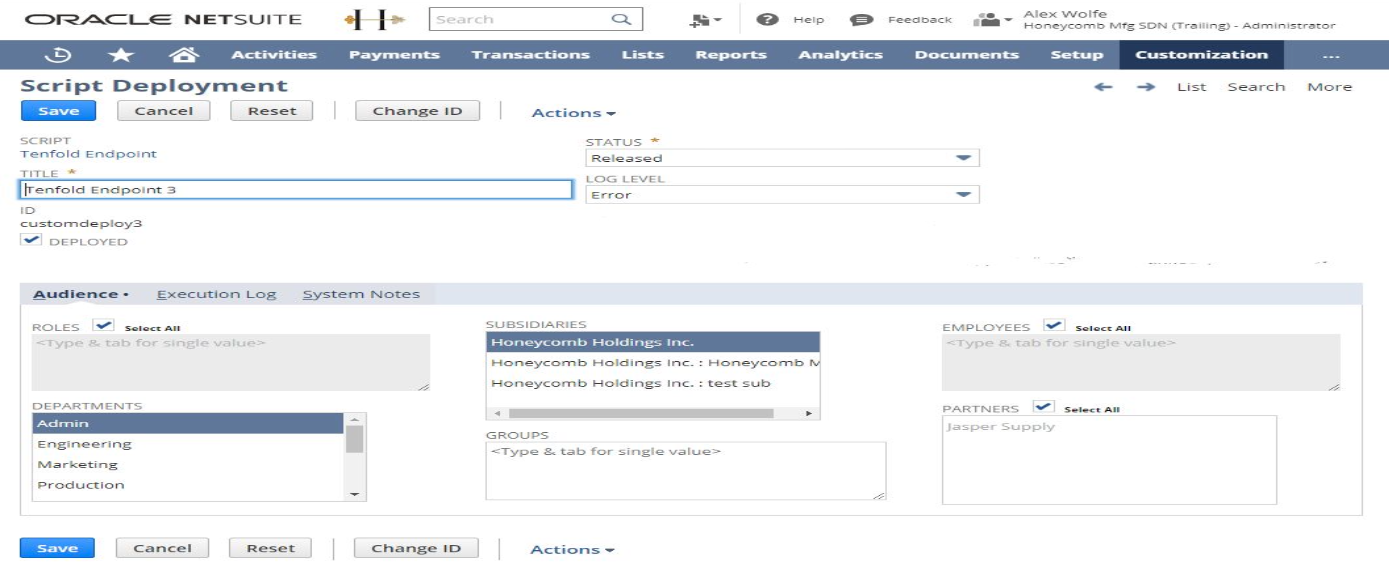
Set up the deployment in the following page as follows: “Status - Released” , “Departments - Admin”, and “Employees - All”
Then, click Save. If you are unsure about any of these “Audience” Settings, just go with the option with the most visibility to the NetSuite Objects we will be interacting with. If All is an option go with that for the broadest Audience Scope.
After deploying, copy the “External URL” for the script.
This will be used to configure the CRM settings of the Tenfold Dashboard. This is also accessible from Customization > Scripting > Script Deployments.
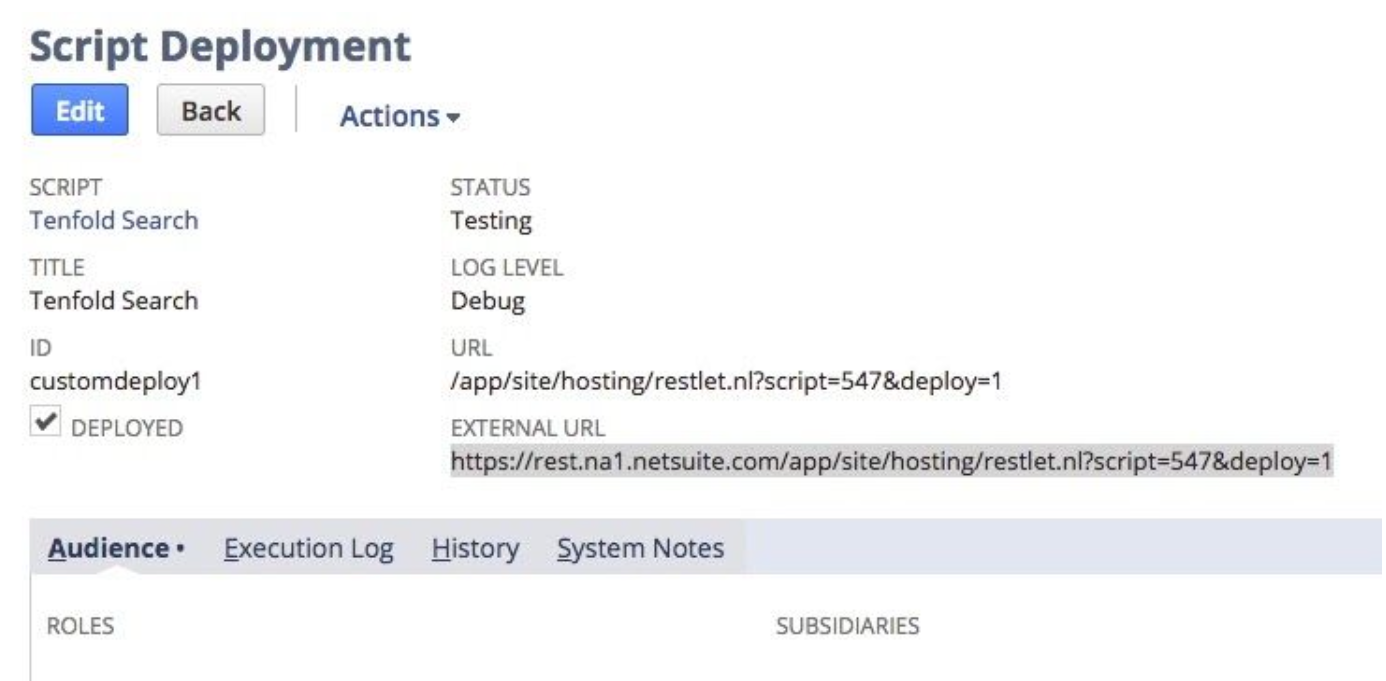
Repeat the steps above (a through h) for the remaining three scripts and copy the “External URL” of each script to a location you can reference later before proceeding to the next section.
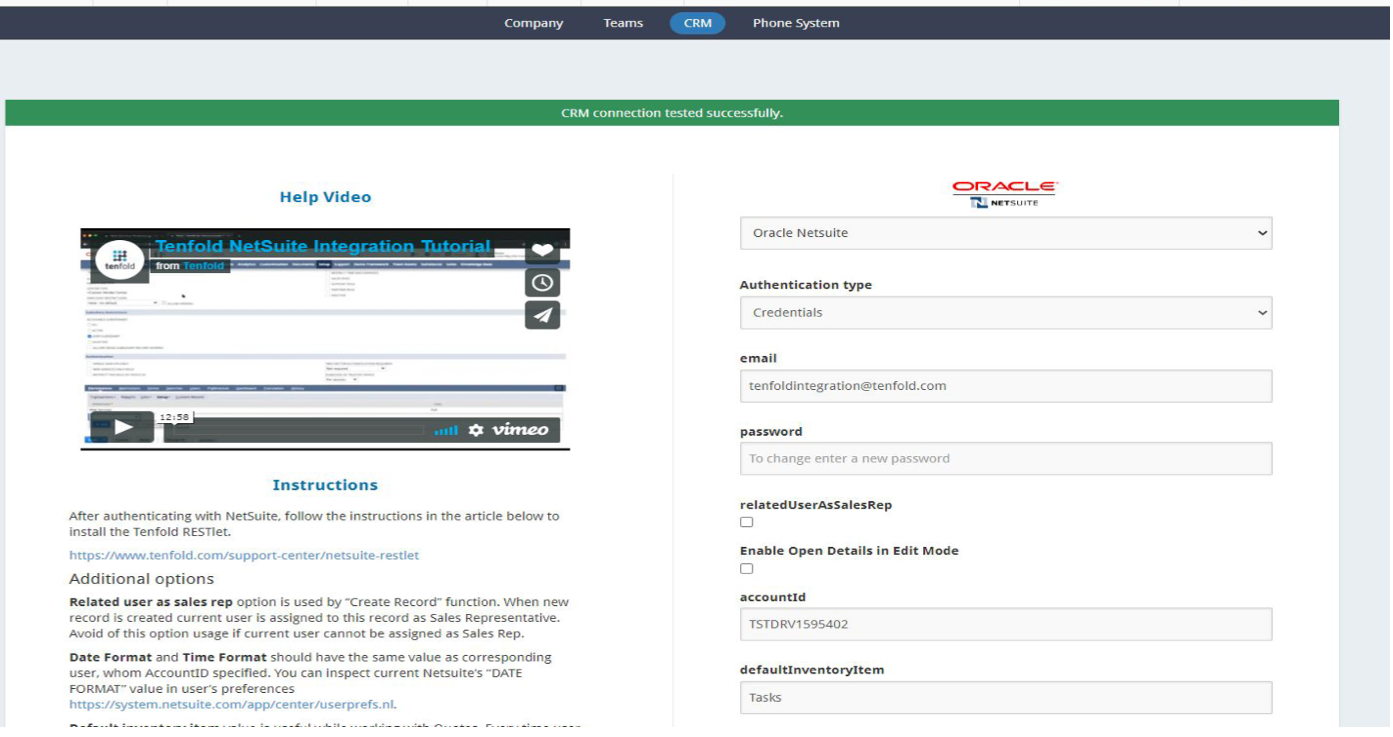
Step 4: Tenfold Dashboard setup with credentials
This section outlines the procedural steps in connecting Tenfold Web Services to your NetSuite environment via the CRM configuration portal in the Tenfold dashboard. Both the API user and RESTlet endpoints will be provided within a single setup pane.
Navigate to your Tenfold dashboard at https://dashboard.tenfold.com.
Click Company Settings in the top navigation.
In the sub-navigation, click CRM.
Select “Oracle NetSuite” as your CRM.
Select Credentials from the Authentication Type list.
Enter the following information into the form:
Tenfold API User Email
Tenfold API User Password
Account ID (Found before “.app.netsuite.com” in your NetSuite URL )
Role ID (Found on the Web Services Preferences Page; its the ID of our Role and Employee)
Environment (Are you using a Sandbox or a Production instance of NetSuite?)
Load Endpoint, Search Endpoint, Upsert Endpoint, and Main Endpoint URLs (created these with the script deployments).
Click Save.
When you click Save, Tenfold tests the connection and displays a success message if the information provided is correct. If the success message does not display, check the Advanced Options in the following steps.
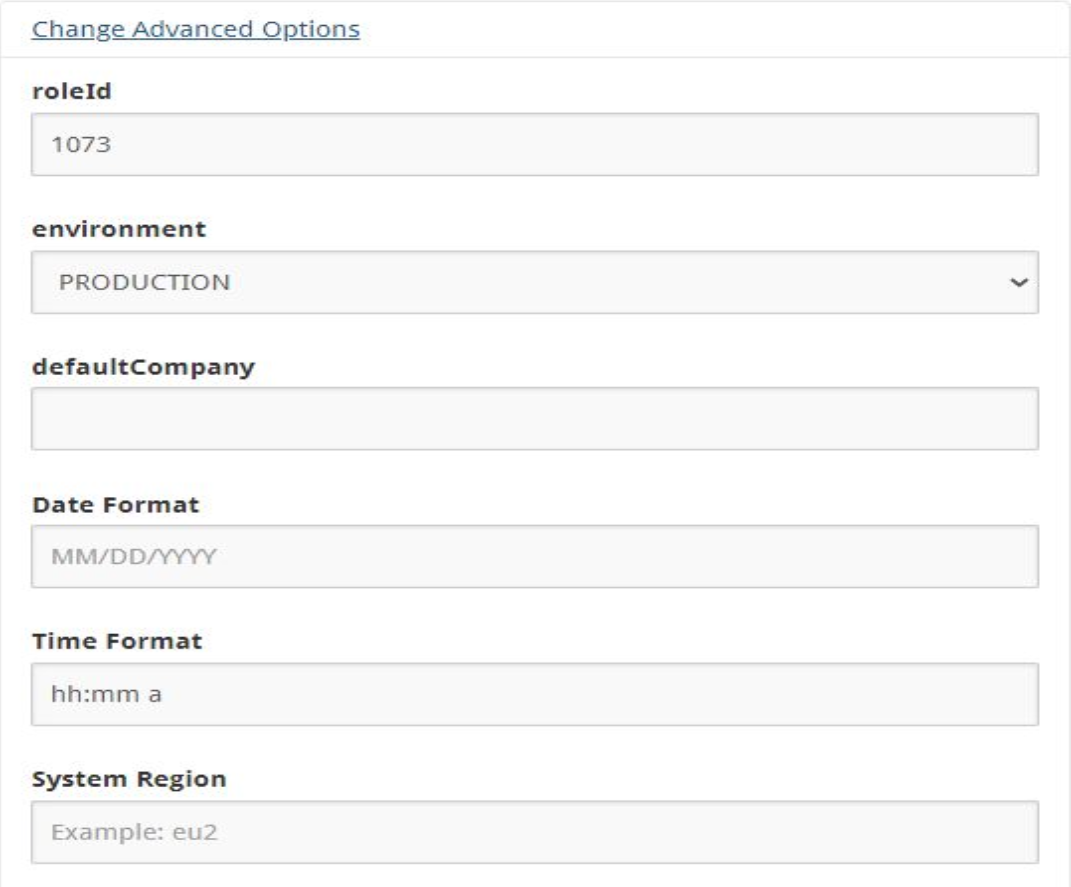
 |
Advanced Options menu
Note
The roleID, Environment, and the four RESTlet endpoints mentioned in Dashboard Setup are available in this dropdown.
This section also includes the two checkbox options above Advanced Options.
Related User As Sales Rep: Attach the Tenfold UI user to any Record they create with Tenfold as the Sales Rep. Note all objects Tenfold makes will have the Tenfold API User as the creator.
Enable Open Details in Edit Mode: When the Tenfold UI opens a NetSuite tab, enable this setting to have it open with field edits available.
Default Company: If you're having issues saving notes to Contacts, check that there is a default Company set for Contacts that don’t have an Account. NetSuite requires Accounts to save a Calls to Contacts.
Date Format & Time Format: You must have the same format for both of these fields as for the NetSuite Instance we are integrating with. You can inspect the current NetSuite Date and Time Formatting value in user's preferences https://system.netsuite.com/app/center/userprefs.nl.
Related user as sales: Used by the "Create Record" function. When a new record is created, the current user is assigned to this record as a Sales Representative.
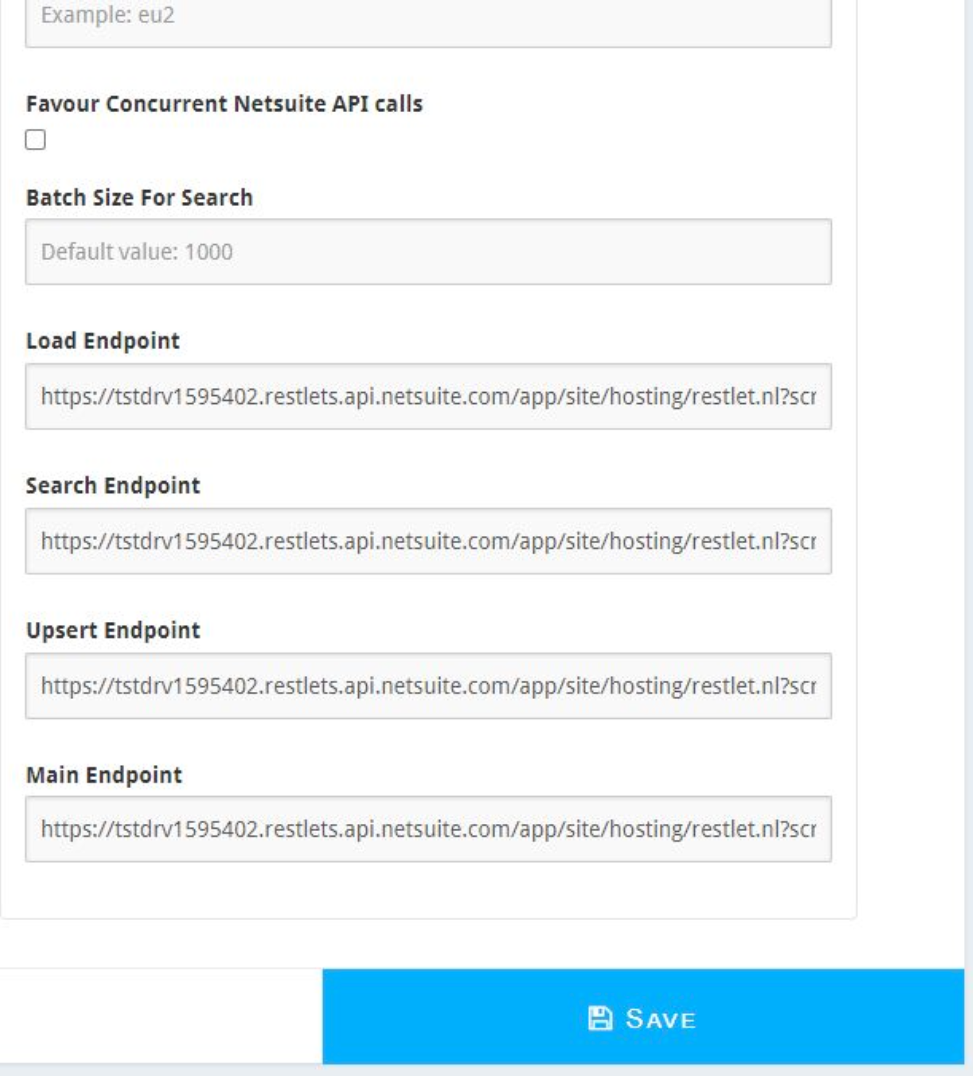
System Region: Is used when there is a need of working with a specific NetSuite Data Center.
Favour Concurrent Netsuite API calls: This can limit the amount of time it takes to look things up in NetSuite. Leave disabled until you notice any lag on CRM queries, but this is much faster than performing CRM requests with Tenfold sequentially.
Batch Size For Search: Defaults to 1000 but can range from 1 to 5000.
 |
 |
Appendix
NetSuite fields
The tables below outline the out-of-the-box entities and respective fields that the core Tenfold integration will interact with. Read and/or write permissions for additional fields, both standard and custom, may be required for your specific Tenfold deployment. Note If we did select a Subsidiary for the Employee and Role we created for this integration we need to make sure any of the below Entities, Modules, and Records are available to that Subsidiary. If your team’s workflow requires a similar, but different field set from this Appendix make sure to notify your Tenfold Support Engineer and provide the same permissions for your teams Field Set (example: We use Agents instead of Employees; make sure the Agent email, entityid, firstname, lastname, and phone fields have read access).
Entity - Employee | Field | Required Permissions |
|---|---|---|
Employee | Read | |
Employee | entityid | Read |
Employee | firstname | Read |
Employee | lastname | Read |
Employee | phone | Read |
Entity - Customer, Lead, Prospect | Field | Required Permissions |
|---|---|---|
Customer, Lead, Prospect | comments | Read |
Customer, Lead, Prospect | companyname | Read / Write |
Customer, Lead, Prospect | datecreated | Read |
Customer, Lead, Prospect | Read / Write | |
Customer, Lead, Prospect | entityid | Read |
Customer, Lead, Prospect | entitystatus | Read |
Customer, Lead, Prospect | firstname | Read / Write |
Customer, Lead, Prospect | homePhone | Read / Write |
Customer, Lead, Prospect | isinactive | Read |
Customer, Lead, Prospect | isperson | Read / Write |
Customer, Lead, Prospect | lastname | Read / Write |
Customer, Lead, Prospect | mobilePhone | Read / Write |
Customer, Lead, Prospect | phone | Read / Write |
Customer, Lead, Prospect | salesrep | Read / Write |
Customer, Lead, Prospect | subsidiary | Read / Write |
Customer, Lead, Prospect | userid | Read / Write |
Entity - Contact | Field | Required Permissions |
|---|---|---|
Contact | comments | Read |
Contact | datecreated | Read |
Contact | Read | |
Contact | entityid | Read |
Contact | firstname | Read / Write |
Contact | homePhone | Read / Write |
Contact | isinactive | Read |
Contact | lastname | Read / Write |
Contact | mobilePhone | Read / Write |
Contact | phone | Read / Write |
Contact | salesrep | Read / Write |
Contact | subsidiary | Read / Write |
Contact | userid | Read / Write |
Module - PhoneCall | Field | Required Permissions |
|---|---|---|
PhoneCall | assigned | Read / Write |
PhoneCall | company | Read / Write |
PhoneCall | completeddate | Read / Write |
PhoneCall | contact | Read / Write |
PhoneCall | endtime | Read / Write |
PhoneCall | id | Read |
PhoneCall | message | Read / Write |
PhoneCall | phone | Read / Write |
PhoneCall | starttime | Read / Write |
PhoneCall | status | Read / Write |
PhoneCall | supportcase | Read / Write |
PhoneCall | timedevent | Read / Write |
PhoneCall | title | Read / Write |
PhoneCall | transaction | Read / Write |
Module - Task | Field | Required Permissions |
|---|---|---|
Task | assigned | Read / Write |
Task | company | Read / Write |
Task | contact | Read / Write |
Task | duedate | Read / Write |
Task | id | Read |
Task | message | Read / Write |
Task | title | Read / Write |
Record - Opportunity | Field | Required Permissions |
|---|---|---|
Opportunity | entitystatus | Read |
Opportunity | expectedclosedate | Read |
Opportunity | probability | Read |
Opportunity | projectedtotal | Read |
Opportunity | status | Read |
Opportunity | title | Read |
Opportunity | trandate | Read |
Opportunity | tranid | Read |
Record - SupportCase | Field | Required Permissions |
|---|---|---|
SupportCase | assigned | Read |
SupportCase | casenumber | Read |
SupportCase | company | Read |
SupportCase | contact | Read |
SupportCase | createddate | Read |
SupportCase | id | Read |
SupportCase | priority | Read |
SupportCase | status | Read |
SupportCase | title | Read |